How to Create Multiple Course Pages in Ghost Using routes.yaml

If you're using the Braun theme (or other modern Ghost themes like Kyoto), you've got some powerful tools at your disposal. One of the most useful - but often overlooked - is the routes.yaml file.
Today, I'll show you how to use it to create different pages using the same template. Apply to Braun, Kyoto and all Ghost themes.
The Challenge This Solves
By default, Braun theme only lets you create one course page with the standard routes setup. But what if you want to offer multiple courses, each with its own dedicated page and content structure? That's where customizing your routes.yaml file comes in.
Understanding How routes.yaml Works with Your Theme
Here's the basic structure of a routes.yaml file
routes:
  /your-url/:
    template: template-name
    controller: channel
    data: page.your-page-slug
    filter: tag:your-tag
Each route needs:
- URL path: Where visitors find your page
- Template: The layout style to use
- Controller: Leave it as it as it. It has to be there. Don’t change :)
- Data: Which Ghost page to reference
- Filter: This tells Ghost which posts to show on this page
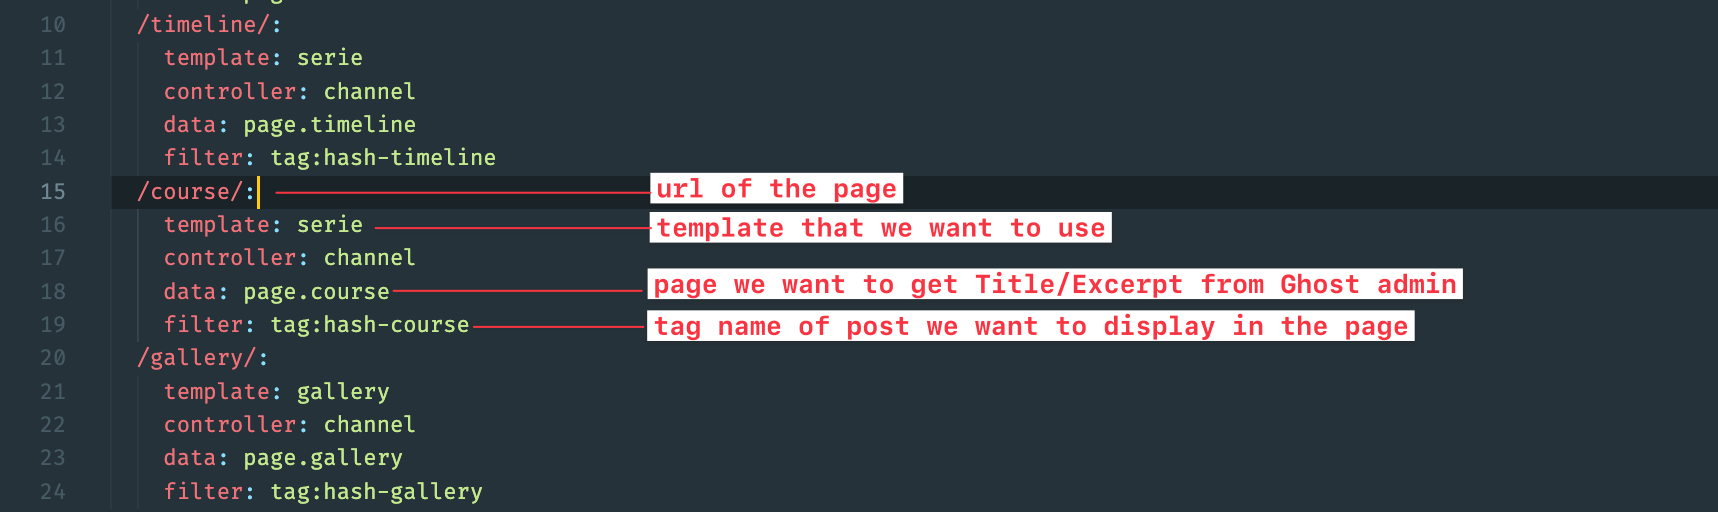
When you open routes.yaml of Braun theme, you'll see something like this:
routes:
  /course/:
    template: serie
    controller: channel
    data: page.course
    filter: tag:hash-course
Let's break this down into everyday language:
/course/: This is just the URL where people will find your page (like yourwebsite.com/gallery)template: serie: we’re using theserietemplatedata: page.course: This connects to the page you create in Ghost so it can that page’s title, excerpt, etc,.. (in this example, we created a page with the URL iscourse)filter: tag:hash-course: we’re filtering all posts that are tagged with#course
Step-by-Step Guide
1. Access Your routes.yaml File
When you unzip the theme file, there’s should be a routes.yaml file. But if you don’t see it, you can follow these steps to download the latest routes.yaml you’re using in your theme:
- Go to Ghost Admin → Settings → Labs
- Look for the Routes section
- Download your current routes.yaml file (save it as a backup)
- Open the file in any text editor
2. Add New Course Routes
Add these lines to your routes.yaml file (keeping existing routes intact):
routes:
  /courses/coding/:
    template: series
    controller: channel
    data: page.coding-course
    filter: tag:course-coding
  /courses/design/:
    template: series
    controller: channel
    data: page.design-course
    filter: tag:course-design
  /courses/marketing/:
    template: series
    controller: channel
    data: page.marketing-course
    filter: tag:course-marketing
3. Upload Modified routes.yaml
- Return to Ghost Admin → Settings → Labs
- Click "Upload routes YAML"
- Select your modified file
4. Create Supporting Pages
- Go to Pages in Ghost Admin
- Create a new page for each course
- Set page URLs to match your routes.yaml
datavalues- coding-course
- design-course
- marketing-course
- Add course descriptions and featured images
- Publish each page
5. Organize Course Content
- Create posts for your course lessons
- Tag them with the corresponding course tag:
course-codingcourse-designcourse-marketing
- Publish lessons in your desired order
Common Questions and Solutions
"My new page is empty!"
- Check if your page URL matches the data value exactly
- Verify your posts have the correct tags
- Check routes.yaml indentation
“404 errors page appears”
- Verify URL paths in routes.yaml
- Ensure supporting pages published
- Clear Ghost cache after updates
While this guide uses Braun theme examples, the principles work with other themes like Kyoto and other Ghost themes. Just check your theme's documentation for available templates and adjust accordingly.
Become a subscriber receive the latest updates in your inbox.