Rand Docs

Introduction
Since this is a Ghost theme documentation, you are assumed to have a basic knowledge of the Ghost CMS.
If you're starting with Ghost, it is best to see the guides in the official Ghost Help Center – check this out, and you'll have all the available information.
Getting Started
Welcome
The Rand theme concept is built for flexibility and easy customization. It leverages existing Ghost features of tags & pages to help you customize your own Ghost site from the Ghost admin interface. Rand is a minimalist magazine meets personal portfolio theme designed for clean, elegant content presentation.
The theme offers these key features:
- Customizable homepage with multiple section components
- Landing page builder using section components
- Resource template for useful listings
- Blog template with horizontal tag navigation
- Linktree-like template for featured links
- Series template for linear reading experiences
- Event calendar
- Light and dark mode
- Beautiful color presets
- Multiple blog posts layouts with table of content support
- About page template for personal profiles
- Rotating gallery section for visual showcases
Install Theme
Upload Zip File
To begin, unzip the downloaded package by double-clicking it on a Mac or by right-clicking and selecting "Extract All" on Windows.
Inside the new Rand folder, you will find the Rand.zip theme files.
Step-by-Step to Upload the Theme to Your Website
- Log in to your Ghost website admin (example.com/ghost).
- Click the settings icon ( ⚙️ ) at the bottom of the left-hand side.
- Go to Design & branding > Theme > Change theme.
- Click Upload theme and select the Rand.zip theme file.
- Once uploaded, click Activate now to activate the theme.
Upload Routes.yaml
The routes.yaml is required if you want to show the following pages:
- Blog
- Tags
- Archive
If you don't want any page above, you can skip this step.
Step-by-Step to Upload the routes file:
- Unzip the Rand.zip theme file.
- In your Ghost admin, click the settings icon ( ⚙️ ) at the bottom of the left-hand side.
- Go to Labs and click Open.
- Click the Upload routes YAML button.
- Select and upload the
routes.yamlfile inside the theme folder. - Done.
Import demo content (optional)
Demo content accelerates your theme setup by providing a fully configured example of the theme's capabilities. Instead of building from scratch, you'll have working examples of content structures, internal tags that showcase best practices for your theme's features.
Before importing demo content, export your existing content as a backup.
To import the demo content:
- Navigate to Settings > Advanced > Import/Export
- Under Import, upload the
demo-content.jsonfile from your theme directory - The demo content includes all pages and posts on the demo site.
To manage demo content:
- Go to Pages/Posts
- Filter by the
Demotag - Edit or replace the content with your own
The demo content provides a foundation to understand the theme's structure and capabilities. You can modify, remove, or expand upon these sections using the theme's built-in components and layouts.
Import Internal Tags (Optional)
This step is to import all the available tags we will use to create content on the homepage.
After importing tags, you can select them from Ghost admin without worrying about typo mistakes that can cause the theme to not work as expected.
Step-by-Step to Import Internal Tags:
- In your Ghost admin, go to Settings > Advanced > Import/Export.
- Under Export, click Export content. This ensures you have a full backup of your current data. Once done, proceed to the next step.
- Under Import, click Universal import.
- Select and upload the
internal-tags.jsonfile from the unzipped theme folder. - Now, navigate to the Tags page within your admin panel to view all available tags under Internal tags.
- That's all for the theme installation!
General Settings
Colors
The theme supports changing the Accent color and offers different color combinations.
Set Accent Color
The Accent color is the primary color used throughout your publication theme in buttons, social sharing hovers, etc. You can change the theme Accent color from the Ghost admin.
Change the Accent color from the admin Settings > Design & Branding > Customize > Brand > Accent color.
Preset Color Combinations
The theme provides different color combinations. Choose the one that fits your style:
- Default
- Pure
- Onyx
- Rust
- Fossil
- Mint
- Ember
- Ice
Step-by-Step to Choose Your Preferred Color Combination:
- Change the Accent color from the admin Settings > Design & Branding > Customize > Theme.
- Click on Color combinations and select your color combination.
Preview and Save.
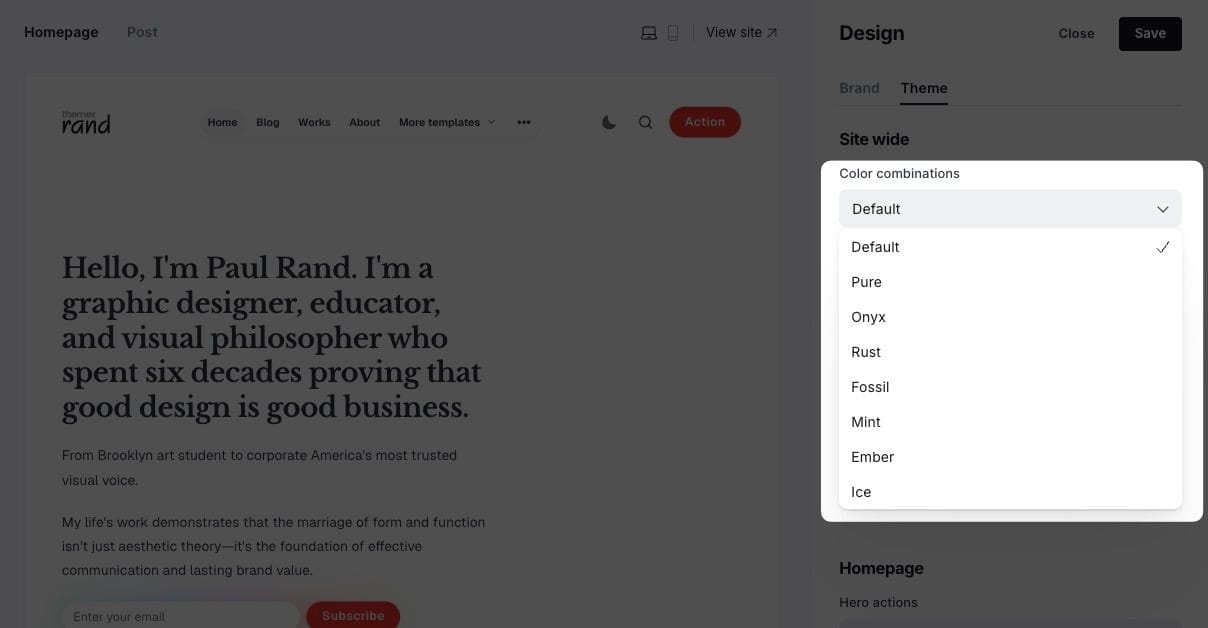
Color combination options
Light / Dark Mode
You can easily switch between light, dark, system, or user-defined modes directly from your Ghost admin panel.
The theme supports:
- Light
- Dark
- System-based
- User defined
Step-by-Step to Customize
- Go to Settings > Design & branding > Brand from the admin menu
- Choose a preferred mode by clicking on Appearance
- Click Save
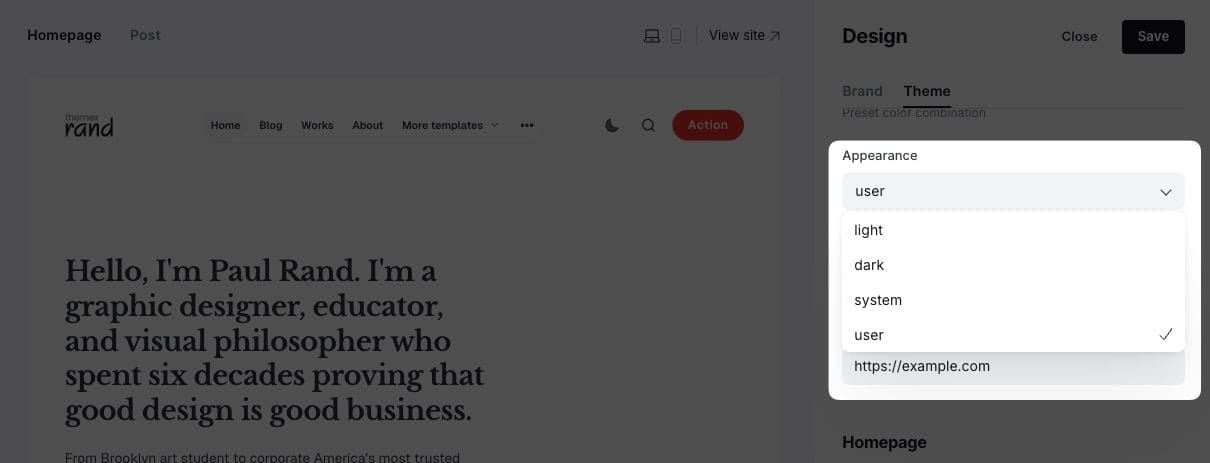
Light/dark mode settings
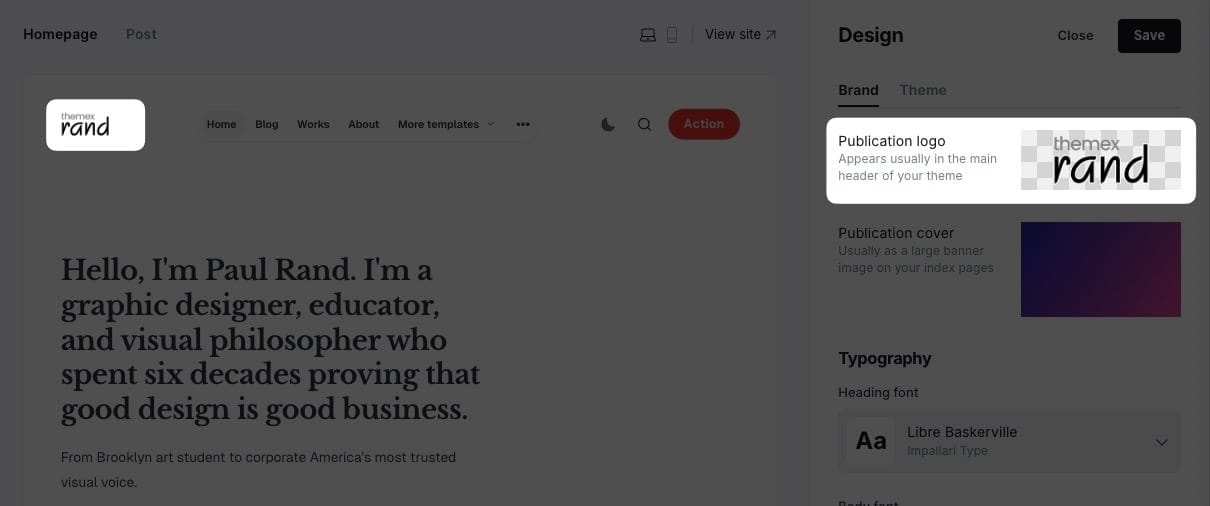
Typography
Depending on the selected option, this setting will change the heading and body text fonts.
Custom Fonts
Ghost provides built-in custom font functionality, allowing users to select heading and body fonts from a curated list directly in the admin interface.
Step-by-Step to Change Fonts:
- Go to Settings > Design & branding > Customize > Brand
- Under Typography, select:
- Title font for headings
- Body font for main text
- Click Save

Typography settings
Host your own Fonts
You can change any font from the Ghost admin interface using Code Injection and Google Fonts, or your own font. For example, if you want to use "Inter" and "EB Garamond" fonts from Google Fonts, your code in Code Injection will be:
<link href="https://fonts.googleapis.com/css2?family=EB+Garamond:wght@500&family=Inter:wght@400;700&display=swap" rel="stylesheet">

<style>
  :root {
    --font-base: 'Inter', sans-serif;
    --font-serif: 'EB Garamond', serif;
  }
</style>
You can also use your custom local font by including it in your theme with a code editor. This technique is more advanced but allows you to add 'your own' fonts.
Check out the detailed guide to add your own fonts
Header Navigation
Step-by-Step to Add an Item to Header Navigation:
- Go to Settings > Navigation > Primary Navigation.
- Type the page's name in the label field as you'd like it to appear on your menu.
- Click on the item's URL. The blog URL will already be auto-populated.
- When satisfied with your page configurations, click the Save button.
Header logo
Header profile displays Publication logo from Settings → Design & branding → Brand
Header Call-to-Action Buttons
You can add your own CTA text and link in the header. If you leave it empty, the button will be hidden.
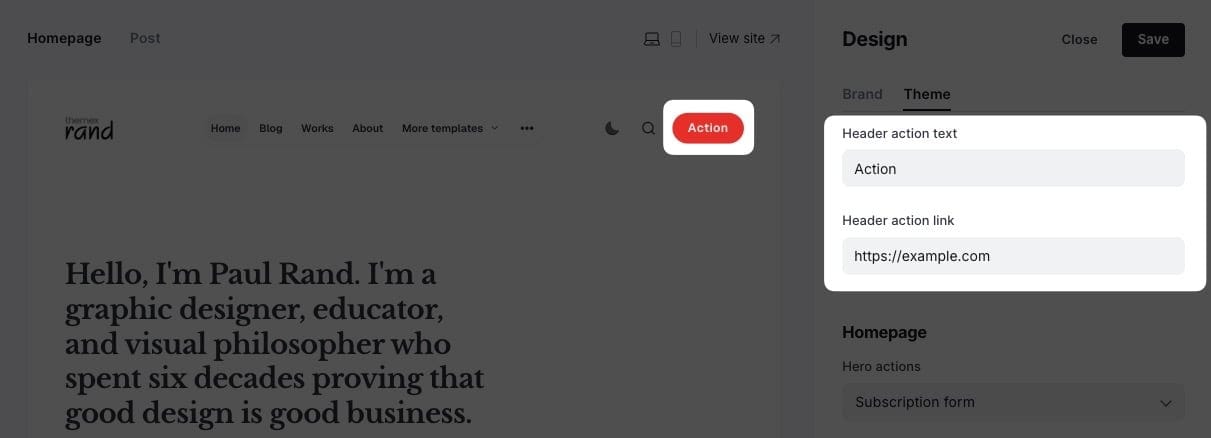
- Go to Settings > Design & branding > Theme
- Scroll to Navigation buttons:
- Add the text to Header action text. Leave it empty if you want to hide it.
- Add link to Header action link
Example configurations:
- Contact button:
- Text: "Contact Us"
- Link: "/contact"
- External link:
- Text: "View Pricing"
- Link: "https://example.com/pricing"
Navigation Dropdown Menus
You can create dropdown sub-menus in your Ghost site navigation to organize your content more effectively and improve site navigation. This feature helps visitors quickly find specific pages under broader categories.
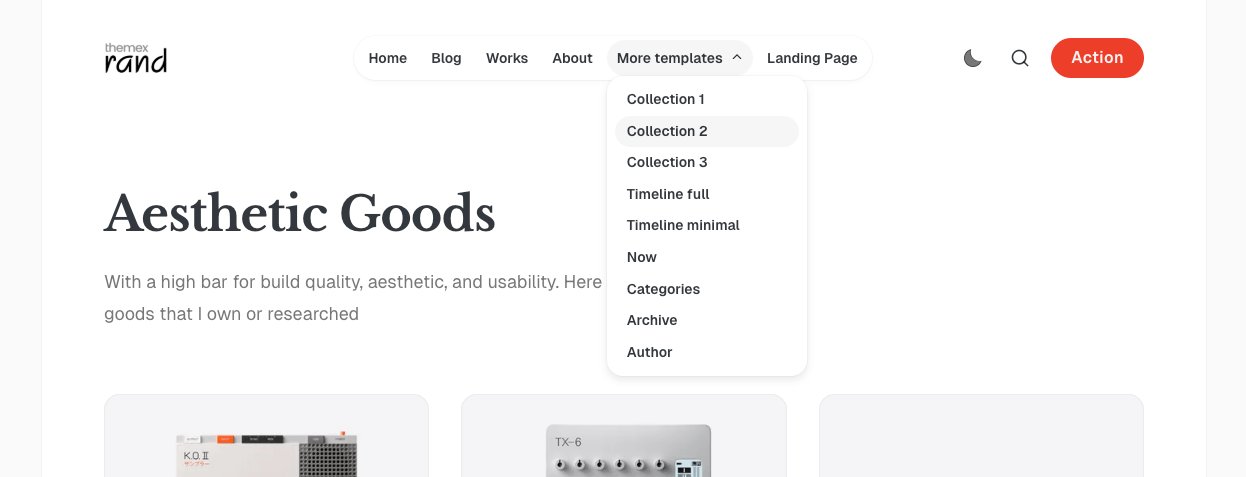
Example of dropdown menu
Follow these steps to set up dropdown navigation menus:
- In your Ghost Admin panel, go to Settings → Navigation
- Add your main menu items normally
- To create submenu items, add them with a dash (-) prefix before the child item
- Arrange items in the order you want them to appear
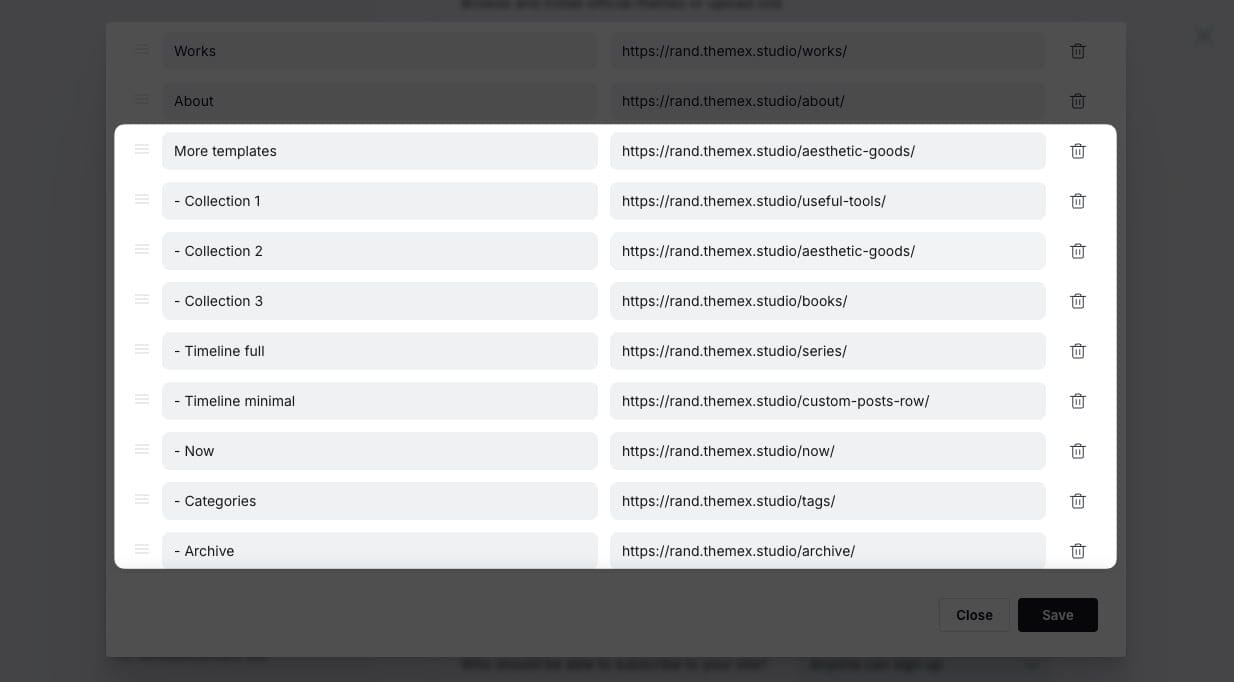
Example Settings
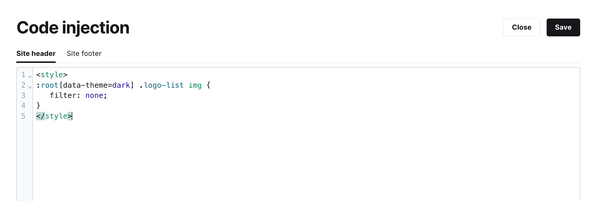
White Logo on Dark Mode
If you use a black logo image and enable dark mode, you would need your logo visible when users enable dark mode.
You can use Code injection and insert this CSS to support different logo color on light/dark mode
<style>
:root[data-theme=dark] .gh-head-logo img {
    filter: invert(100%);
}
</style>
Footer
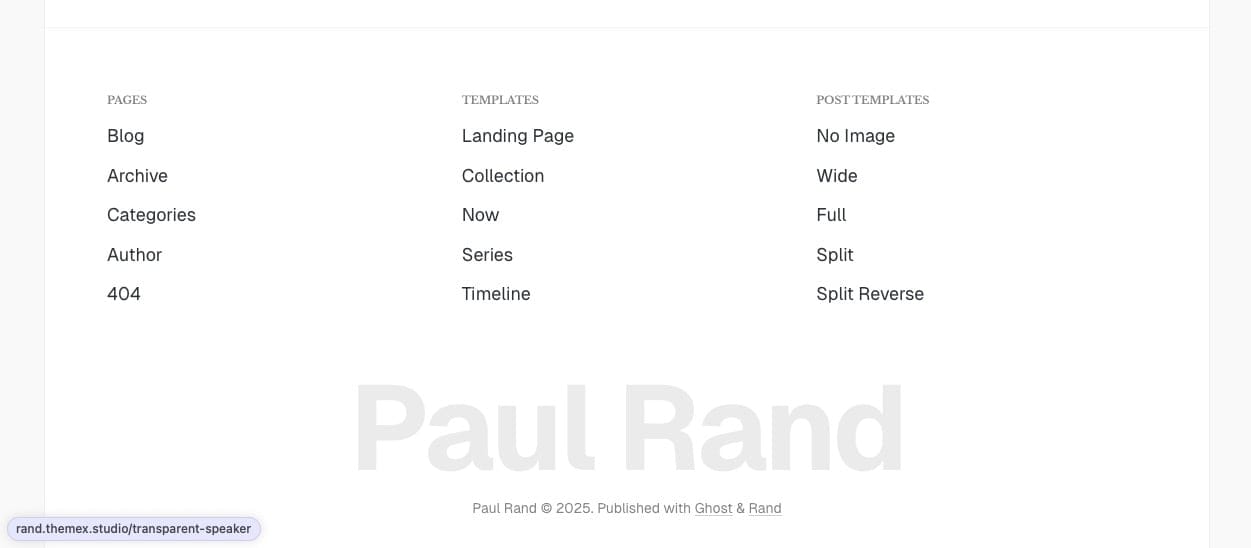
Footer navigation example
Like the header, you can add the footer navigation links from the Ghost Admin Settings > Navigation > Secondary
To group footer items into different groups, add # before the name.
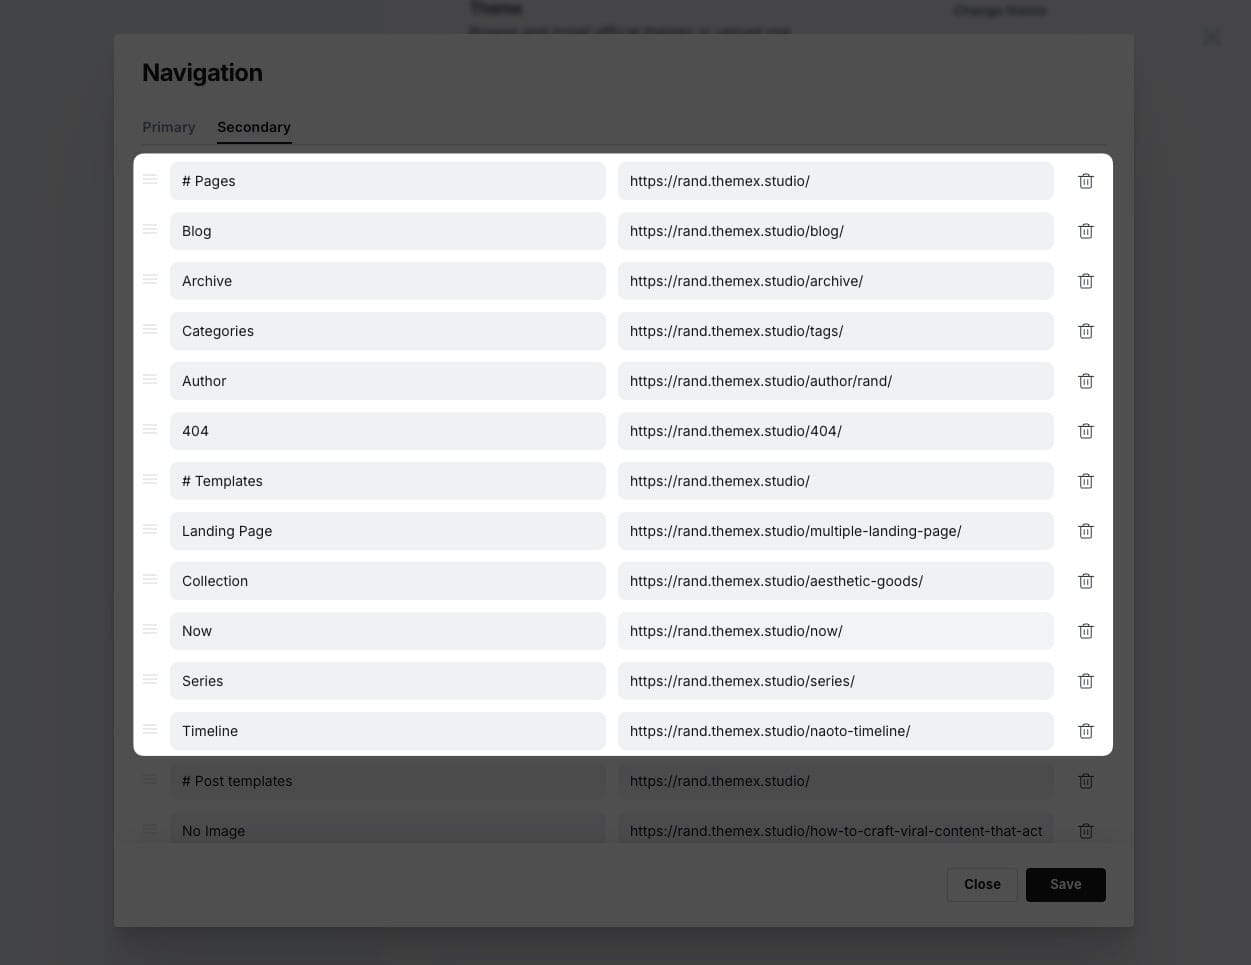
Footer navigation groups
Homepage
Homepage sections
The Rand theme is designed for flexibility and easy customization, allowing you to build a dynamic homepage using Ghost's built-in features. You can manage your homepage sections directly from the Ghost admin interface, no coding required!
After uploading the theme and uploading the routes.yaml file, the homepage is up with several default sections including Hero, Gallery, Highlights, and Blog. If they are all you need, you can skip this section.
But if you want to add more sections to the homepage, do follow the guide below.
Homepage Layout Structure
The Rand theme divided into two part: Top and Bottom.
Top part
Including those sections
- Hero section
- Highlights section
- Home gallery
- Logos section
Bottom part
The bottom part uses a unique two-column layout for the homepage content area.

Left Column (Main Content):
- Contains the main homepage sections like Blog, Showcases, Blocks, and all other available sections listed here.
- Displays the primary content sections configured in your homepage settings
Right Column (Sidebar):
- Contains the subscription box with email signup
- Displays secondary sections like Events and latest Now sections
This layout creates a balanced homepage that emphasizes your main content while providing a dedicated space for subscription and timely information.
How it works
The Rand theme homepage is built from pages that you create in Ghost admin. Each section is controlled by:
- Special tags - Internal tags that define what type of section it is
- Configuration setting - Controls which sections actually appear on your homepage
- Publish dates - Determines the order of sections
List of sections and its slug
| Section Name | Tag to Use | Corresponding Slug | Usage |
|---|---|---|---|
| Home Intro | #home-intro |
hash-home-intro |
Display the intro section on homepage |
| Gallery | #home-gallery |
hash-home-gallery |
Display rotating gallery images with optional links |
| Highlights | #section-highlights |
hash-section-highlights |
Display a grid of highlighted/featured content or resources. |
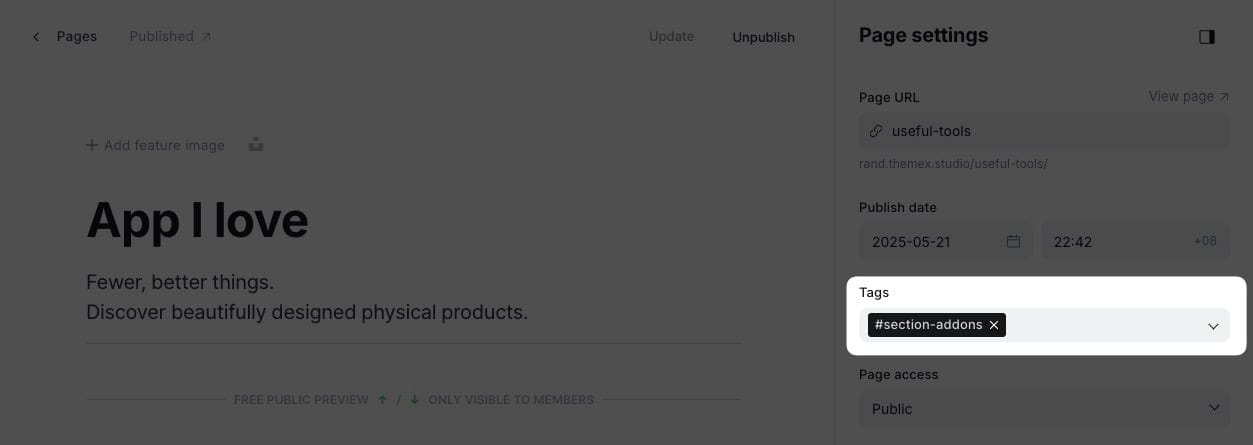
| Addons | #section-addons |
hash-section-addons |
Display a grid of add-ons or resources. |
| Blocks | #section-blocks |
hash-section-blocks |
Show a grid of blocks (e.g., products, features). |
| Blocks Vertical | #section-blocks-vertical |
hash-section-blocks-vertical |
Show blocks in a vertical layout. |
| Showcases | #section-showcases |
hash-section-showcases |
Highlight showcase items or projects. |
| Testimonials | #section-testimonials |
hash-section-testimonials |
Display testimonials from users or clients. |
| Experiences | #section-experiences |
hash-section-experiences |
List work experiences or milestones. |
| Static Banner | #section-static-banner |
hash-section-static-banner |
Show a static banner section. |
| Static Text | #section-static-text |
hash-section-static-text |
Display a static text section. |
| Custom Posts | #section-custom-posts |
hash-section-custom-posts |
Show a row of specific posts by tag. |
| Now | #section-now |
hash-section-now |
Display the latest 'Now' post (see Now page instructions). |
| Custom Content | #section-custom-content |
hash-section-custom-content |
Add any custom content from a page |
| Events | #section-events |
hash-section-events |
List events or event cards. |
| Logos | #section-logos |
hash-section-logos |
Display a logo wall or list of logos. |
Notes on using internal tags:
- In the page editor, find the Tags field and type the tag (e.g.,
#section-addons) - You can easily see the pattern between tag name and its slug. Tags with
#prefix are added a labelhash-before the name - It only works when the tag is the first one
- Internal tags start with a
#and are not visible to visitors, so your site is clean from search engines.
Arrange Section Order
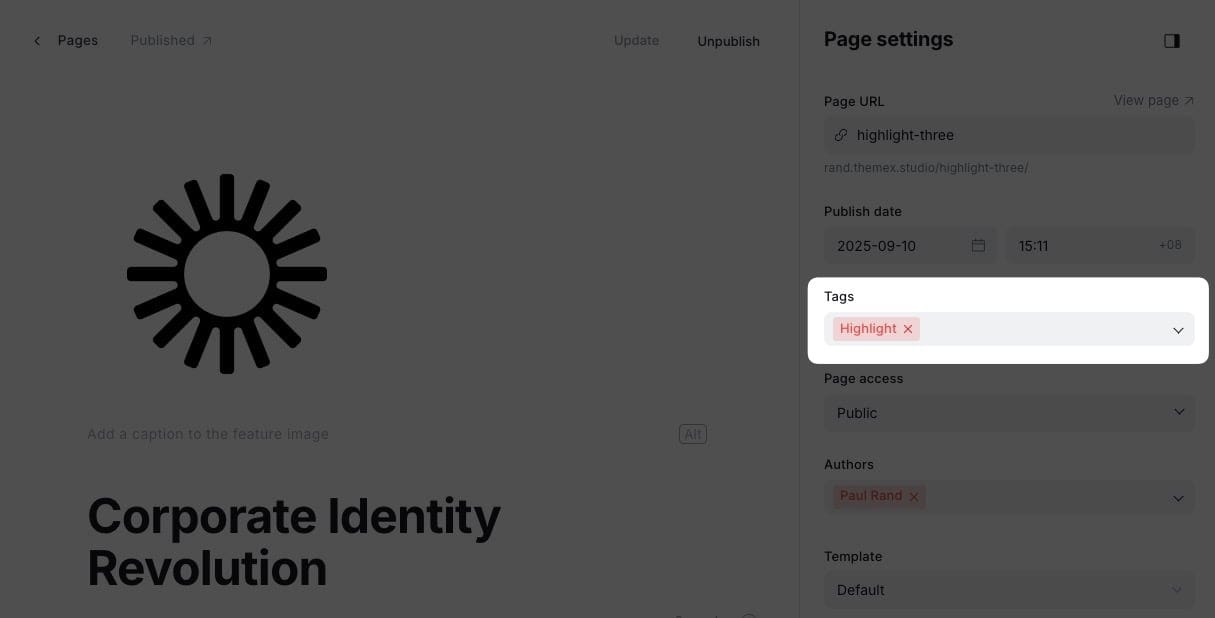
The order of homepage sections is determined by the publish date of each page, older pages show first. To change the order:
- Go to Pages in Ghost admin.
- Click on the page of the section page you want to move.
- In Page settings, adjust the Publish date. Older dates appear first.
- Click Update to save changes.
Sections Configuration
You can control which sections appear on the homepage from the theme settings.
You can easily add/remove section showings on the homepage. You can do that from Theme's Settings at Settings → Design & branding → Customize → Theme → Homepage sections
Default Section
Homepage sections contains a comma-separated list of section tags that controls what appears on your homepage.
By default, the theme displays Experiences, Testimonials, and Custom Posts in the left column, with permanent Hero, Gallery, Highlights/Logos, and Blog sections.
hash-section-experiences,hash-section-testimonials,hash-section-custom-posts
Note: The Gallery, Highlights, and Logos sections are configured separately and appear in the upper section of the homepage automatically when content is tagged appropriately.
Adding a Section
Add the section tag to the Homepage sections:
hash-section-showcases,hash-section-static-text,hash-section-logos,hash-section-testimonials
↳ Added Testimonials section
Removing a Section
Delete the section tag from the Homepage sections:
hash-section-showcases,hash-section-static-text
↳ Removed Logos section
Hero Section
The hero section is permanently set to the top section of the homepage.
The theme supports both simple and extensive text with reveal animation on scroll, giving you more flexibility for your homepage introduction.
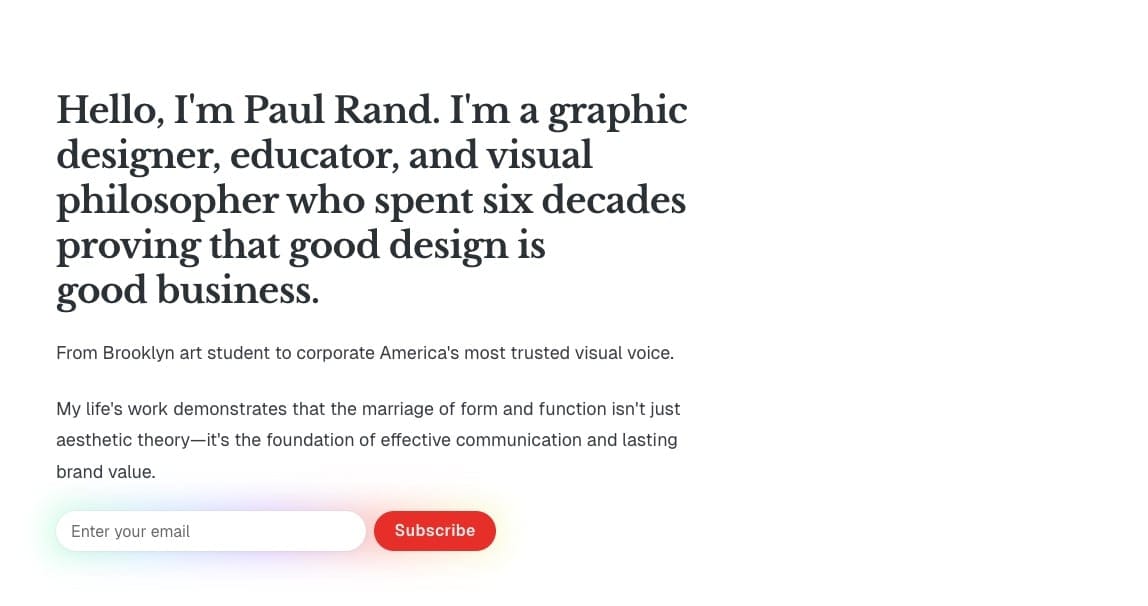
Default option
By default, the theme shows the Site title and description from General settings in the hero.
Step-by-Step to change default option
- Log in to your Ghost Admin dashboard.
- Go to Settings → General settings → Title & description → Edit
- Edit Site title and Site description to change the content.
- Save and refresh the homepage
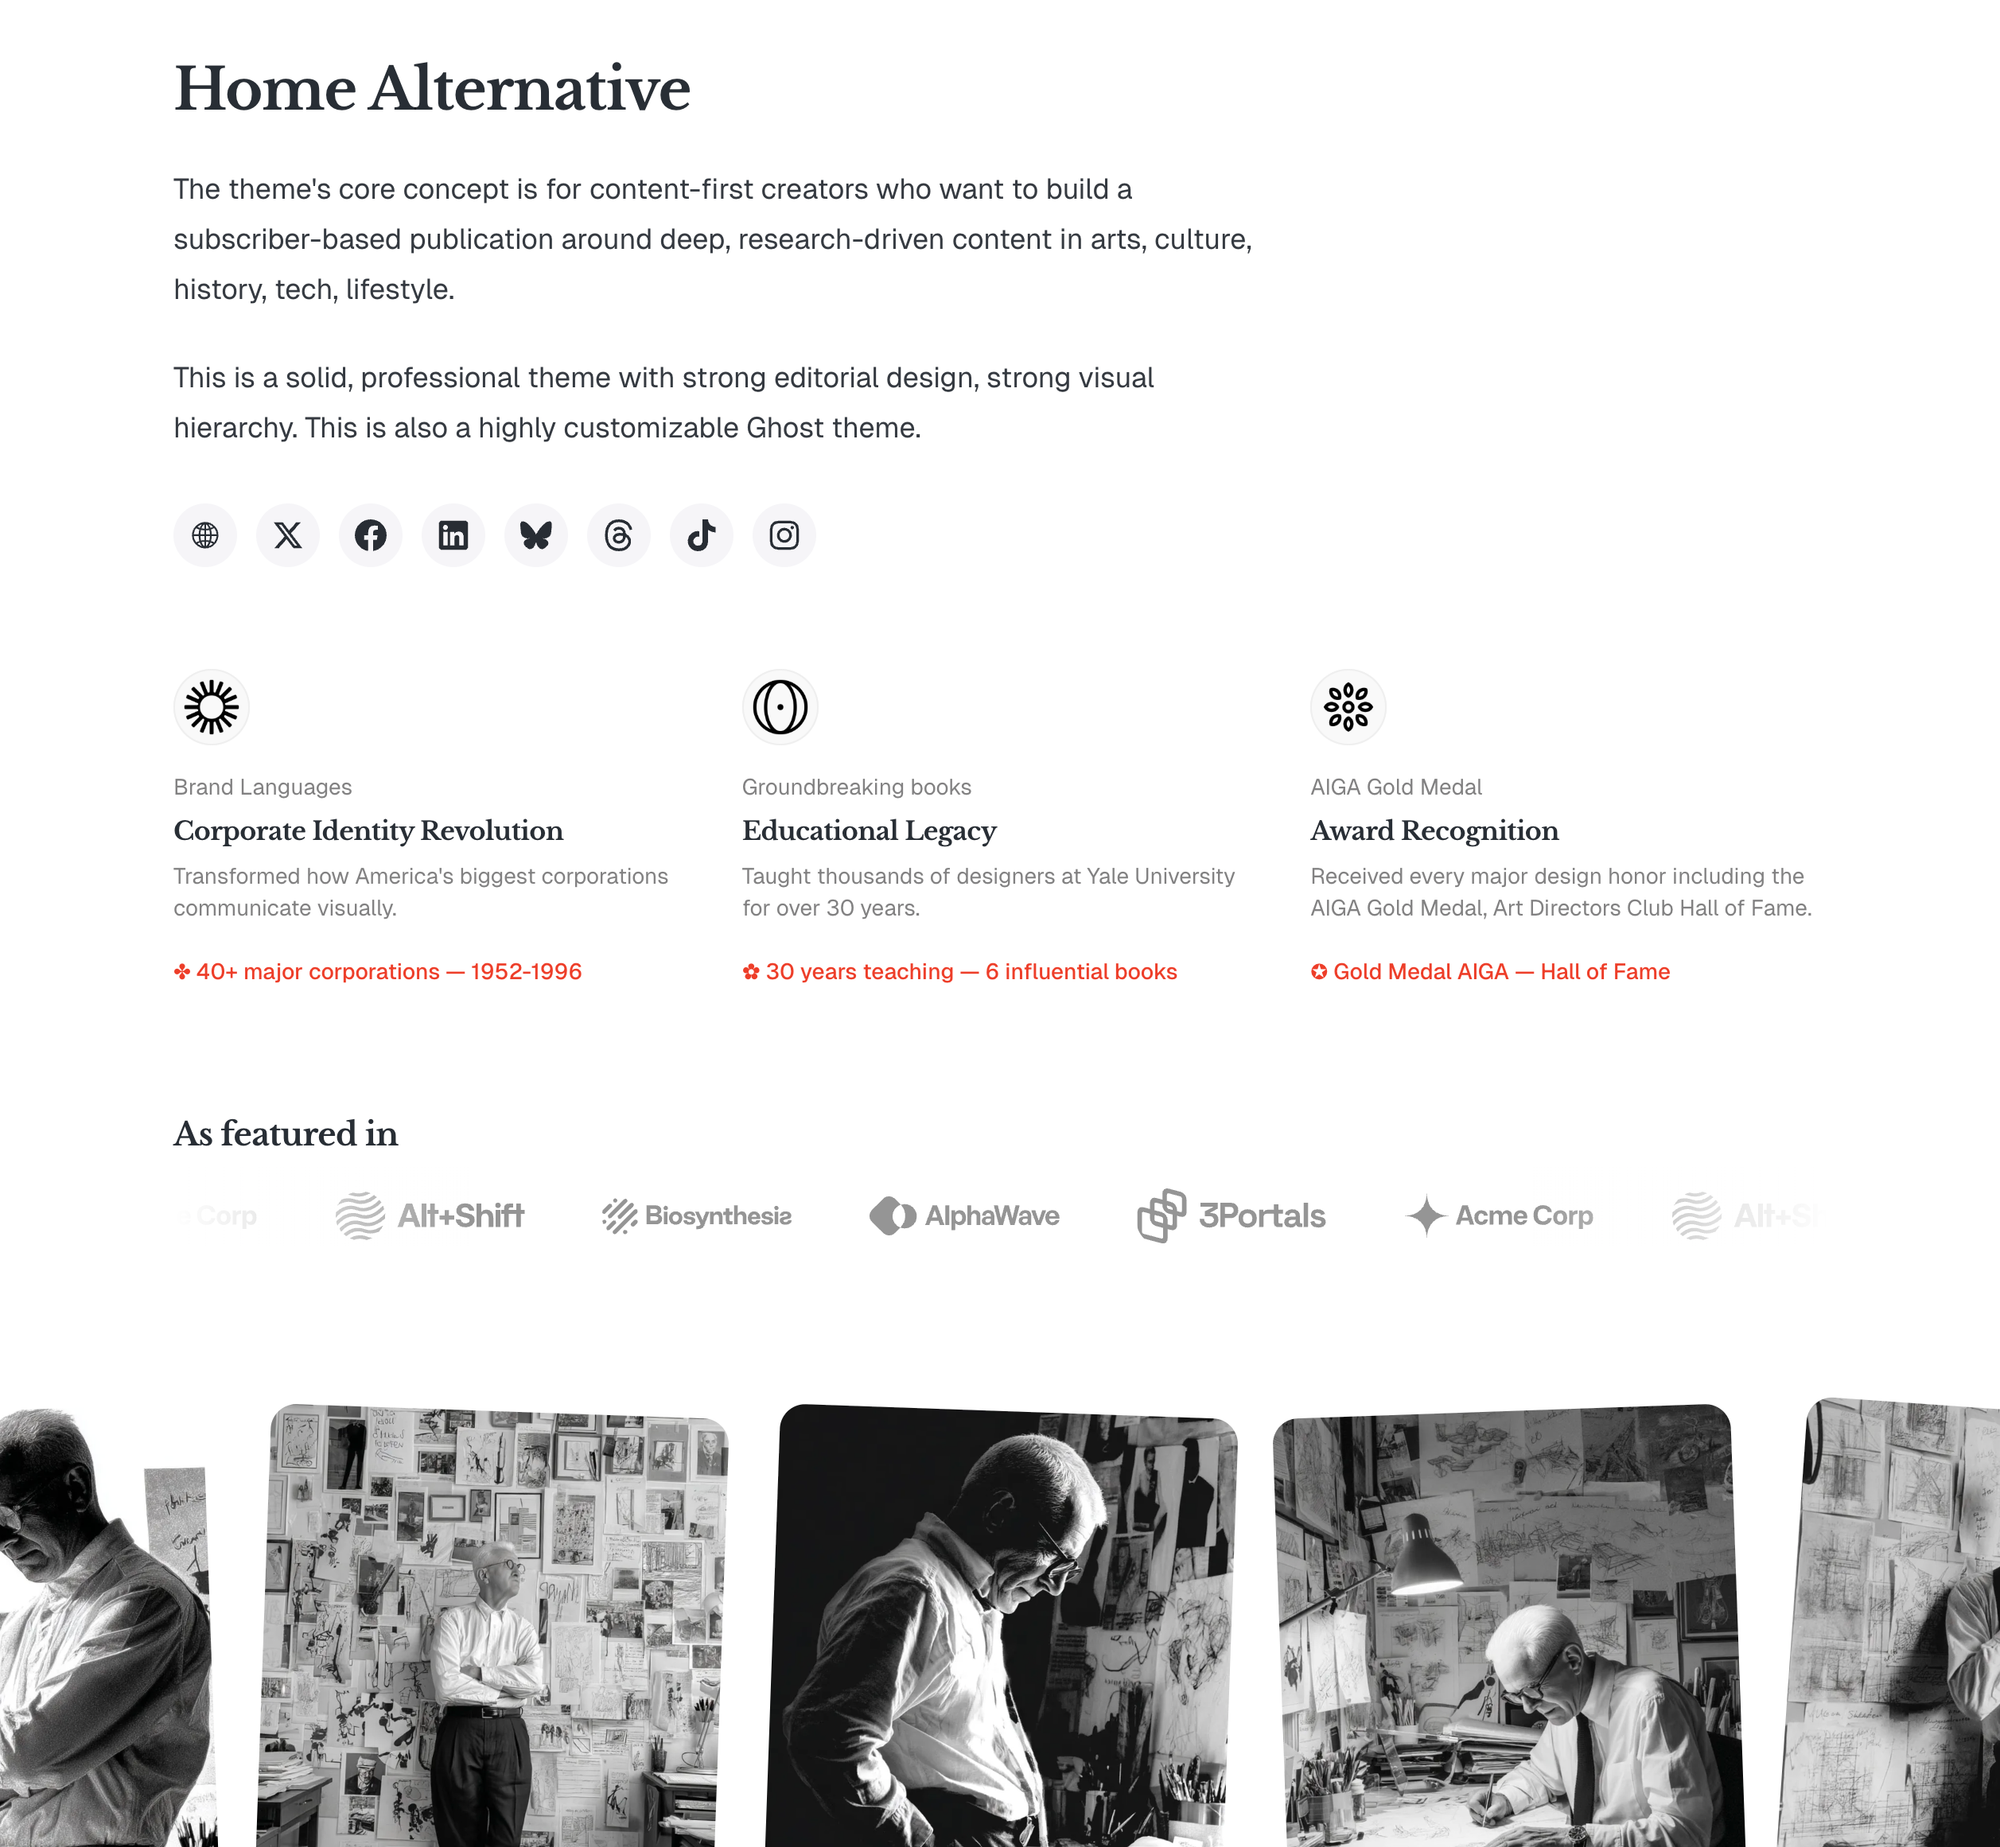
Extensive option
For more extensive hero text with formatting options and animation.
Step-by-Step to use Extensive option
- Log in to your Ghost Admin dashboard.
- Click on Pages in the left sidebar.
- Click New page to create a new page.
- Add your hero text content in the editor. You can:
- Format text with bold, italic, or other styles
- Add multiple paragraphs, headings, images, etc.
- Include links or other content elements
- Add the tag
#home-introto the page (important!)- Click the settings icon (⚙️) in the top right
- Go to the "Tags" section
- Type and select
#home-intro
- To add reveal animation, add the second additional tag
#animateto the Tags section - Publish the page when you're done.
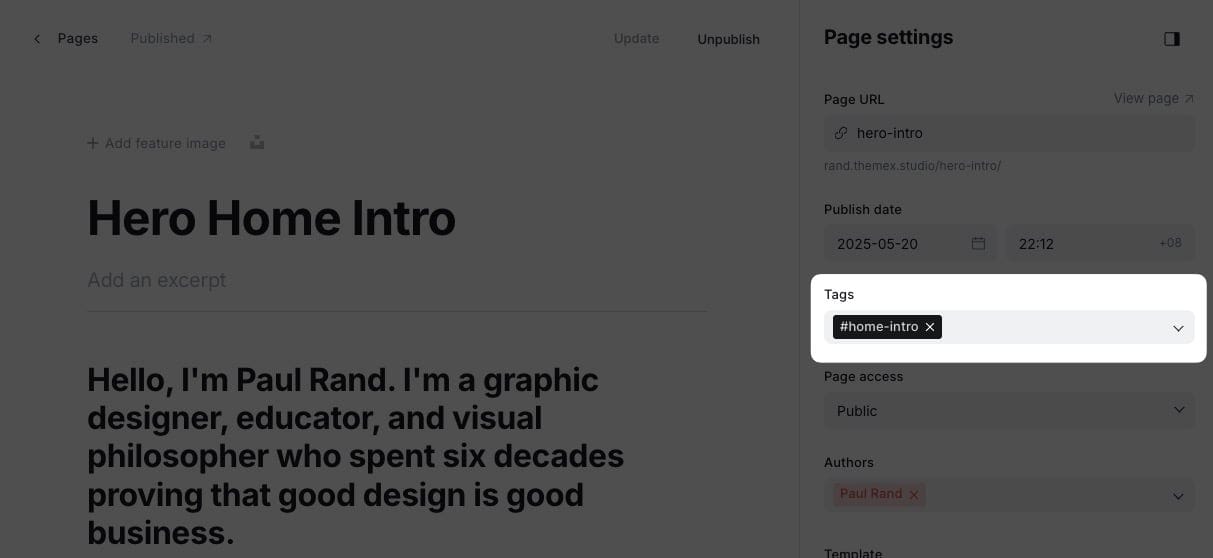
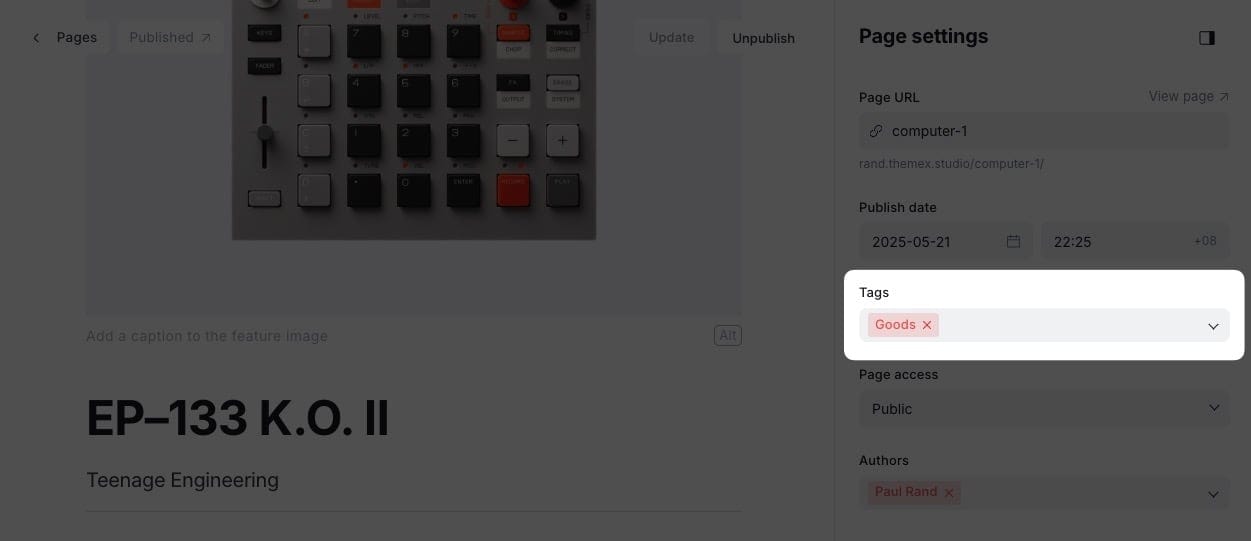
Example of hero section page settings
Hero Actions
Choosing to show social links, subscription box or just nothing.
Step-by-Step to set hero action
- Log in to your Ghost Admin dashboard.
- Go to Settings → Site → Design & branding → Customize
- Go to Theme tab and find the Homepage section.
- Locate the Hero actions dropdown, select the option you want
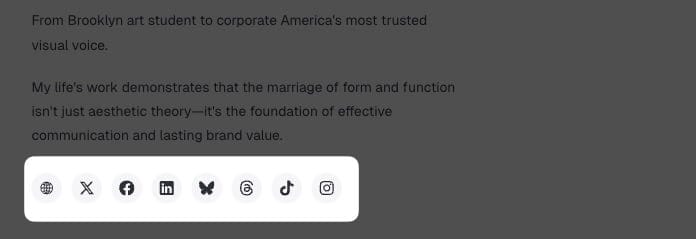
- Social links: show the author's Social Links
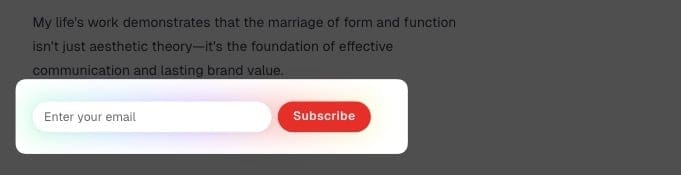
- Subscription form: show the subscription box
- None: No action shown
- Save and refresh the homepage
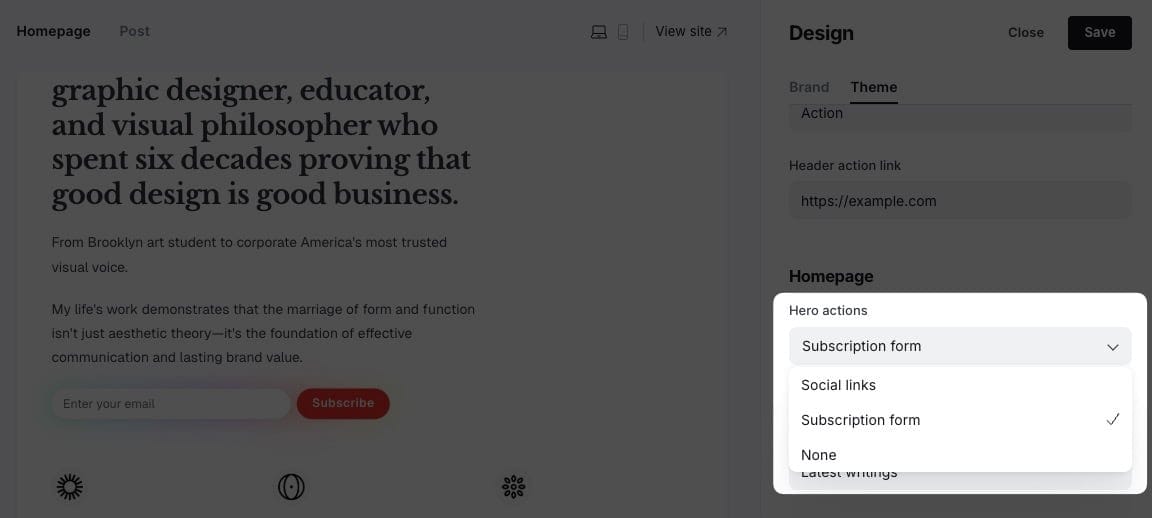
Hero actions settings
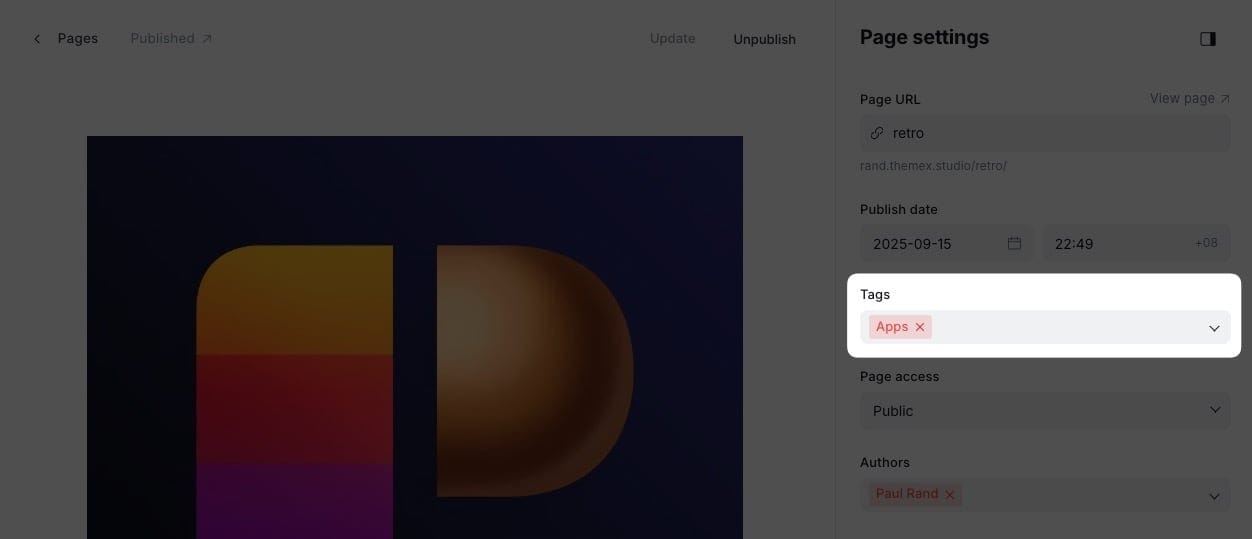
Edit Author Social Links
- In the Ghost Admin Settings, go to Staff and select the primary author whose social links you want to display. (Note: The primary author is the first author added in the Authors field of the
#section-heropage we created above) - Add your social profiles (such as Website, Twitter, Facebook, LinkedIn, Bluesky, Threads, Mastodon, TikTok, YouTube, Instagram) in the corresponding fields.
- Save your changes.
Gallery Section
The gallery section displays a collection of rotating images on your homepage, creating an engaging visual showcase. Each gallery item can optionally link to its content page or external URLs, making it perfect for portfolios, photo galleries, or featured work.
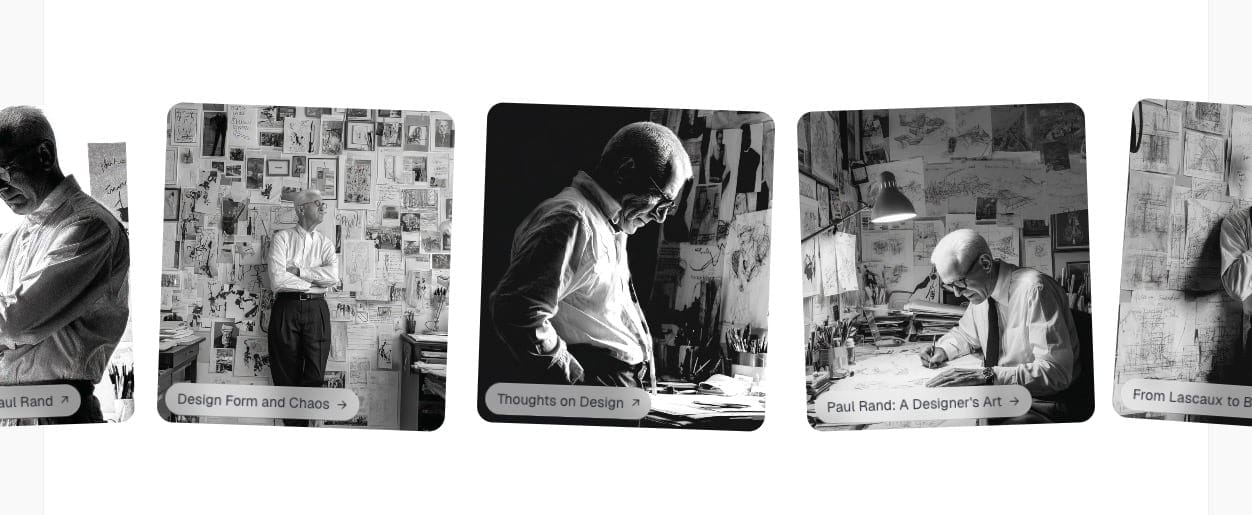
The gallery automatically creates a rotation effect with images positioned at different angles to create visual interest.
Gallery Content Source
You can choose whether your gallery pulls content from Posts or Pages.
- Go to Settings > Design & branding > Theme > Homepage
- Find Gallery content source setting
- Select either Posts or Pages
- When using Posts as the source, posts tagged with
#home-gallerywill be shown. - When using Pages as the source, pages tagged with
#home-gallerywill be shown.
- When using Posts as the source, posts tagged with
- Click Save
Step-by-Step to Add Gallery Section
- Create posts/pages (depend onf Gallery Content Source above) with featured images for each gallery item you want to display.
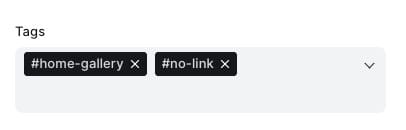
- Tag each post with
#home-gallery(this is an internal tag that won't be visible to visitors). If you want static item (instead of link), add#no-linktag. - The gallery will automatically display up to 6 posts tagged with this tag.
- Images are automatically optimized for responsive display.
Gallery Link
When gallery links are enabled:
- Posts with a Canonical URL will link to the external URL and open in a new tab
- Posts without a Canonical URL will link to the post
When gallery links are disabled (with #no-link):
- Images are displayed without clickable functionality
- Creates a purely visual gallery experience
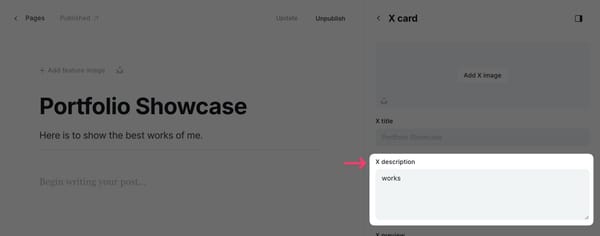
Highlights Section
Display a grid of highlighted or featured content prominently on your homepage. This section is perfect for showcasing your most important work, featured articles, or key offerings. The highlights section displays content in a compact, visually appealing grid format.
Setup Highlights Section
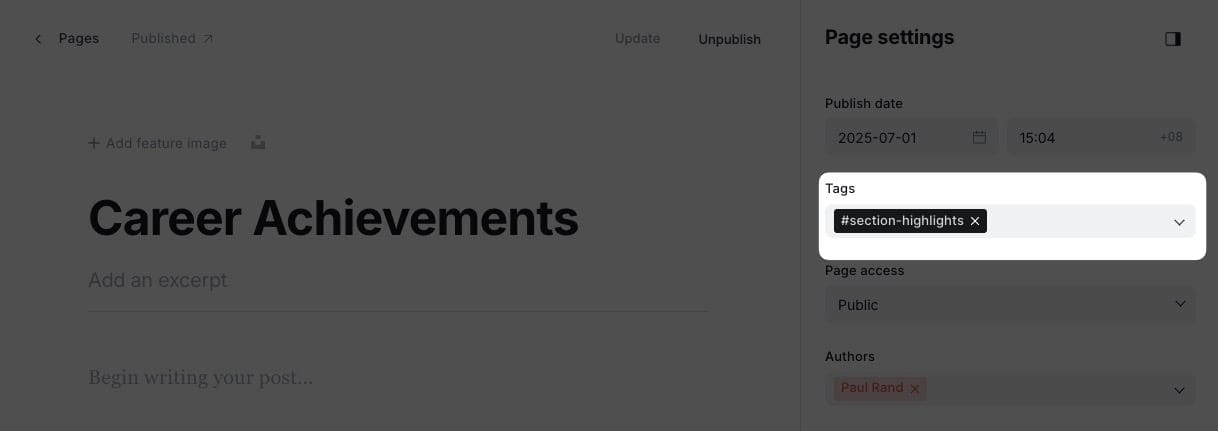
- In Ghost admin, create a new page.
- Give it a title; this title will be shown on the homepage.
- [⭐️ Important] Add
#section-highlightsto Tags input.- To show posts instead of pages, add
#source-poststag as well.
- To show posts instead of pages, add
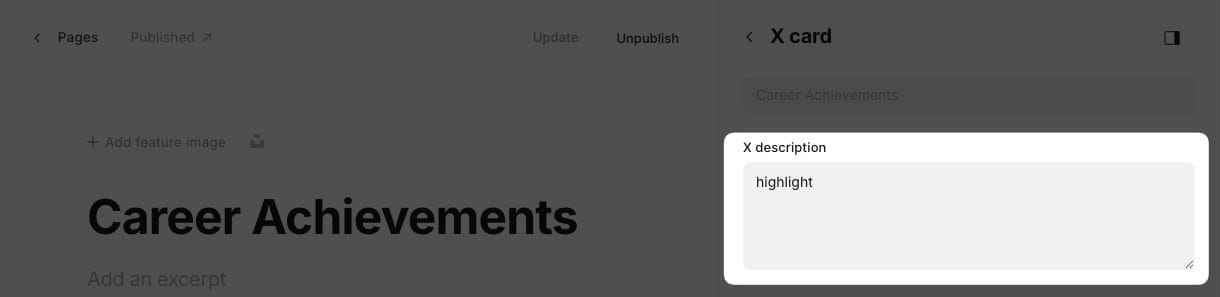
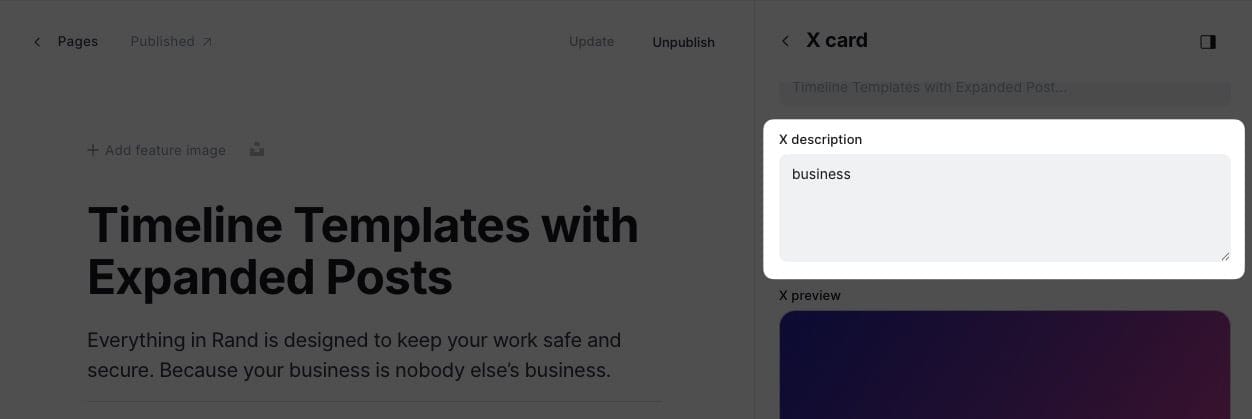
- [⭐️ Important] Click on X Card → X description field, add the tag slug of the page you want to show as the content. This will 'filter' specific pages for this section. You can filter multiple tags. i.e. putting
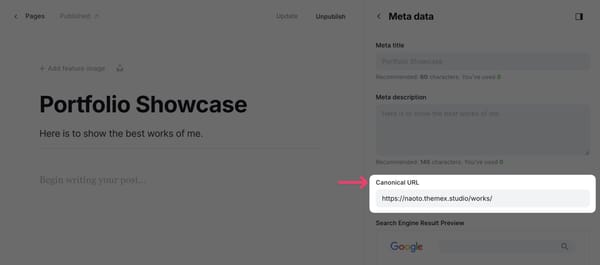
featured,highlights,showcaseif you want to show pages that are tagged asFeatured, Highlights, Showcase - If you want to create separate page showing Highlights content, select Page Collection in Template — the View all link will lead to this page.
- View all link options
- By default, View all will link to that separate page
- If you want it to lead to a different page, add the new URL in Meta data → Canonical URL
- If you want to hide it, add
#no-titleto the Tags
- Publish.
☝️ To find the exact tag slug, go to Tags in the Ghost admin home, click on the tag name, then copy the text in the Slug field.
Add Highlights Content
- In the Ghost admin page, go to Pages (or Posts if you added
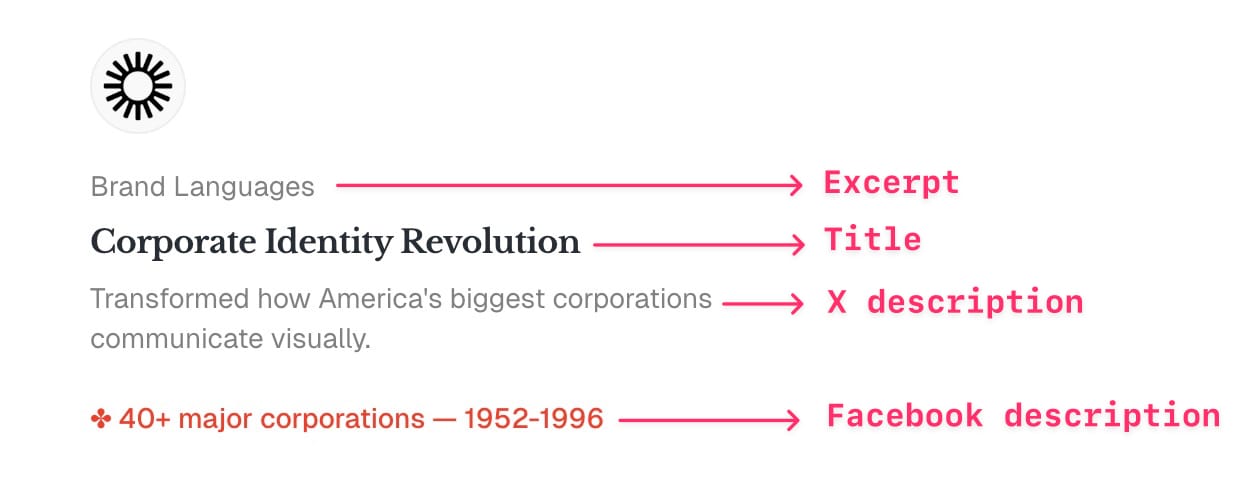
#source-posts) > click on New page. - Enter information for this project. Page title as the title, Excerpt as the project description, X description as eyebrow sub-header (above the title), and featured image.
- Tag the page with the tag you used in the X description field in the showcase section page above (e.g. Works)
- (Optional) If you want to lead visitors to an external site, add the URL at Metadata > Canonical URL. By default, the link will lead to the Page detail.
- (Optional) If you want to show a highlight text, add the text to Facebook card → Facebook description
- Publish.
- Repeat the same steps to create different content blocks for the showcase section.
Blog Feed Section
The blog section will contain the latest posts that you published and a shortcut link to go to the /blog page.
By default, the blog section is shown right under the hero section. You can change the section name in the Settings (Settings → Site → Design & branding → Theme → Home feed title).
But if you want to easily change the order of the blog section to any position, follow these steps:
Step-by-Step to Add the Blog Section
- In Ghost admin, create a new page.
- Give it a title, any name. This title will be the title shown on the homepage and the blog page.
- From the Page settings, ensure that the Page URL setting is
blog. This is the most important step. - Publish and open the homepage to check.
Different Post Styles
Rand supports different post styles and different featured image aspect ratios.
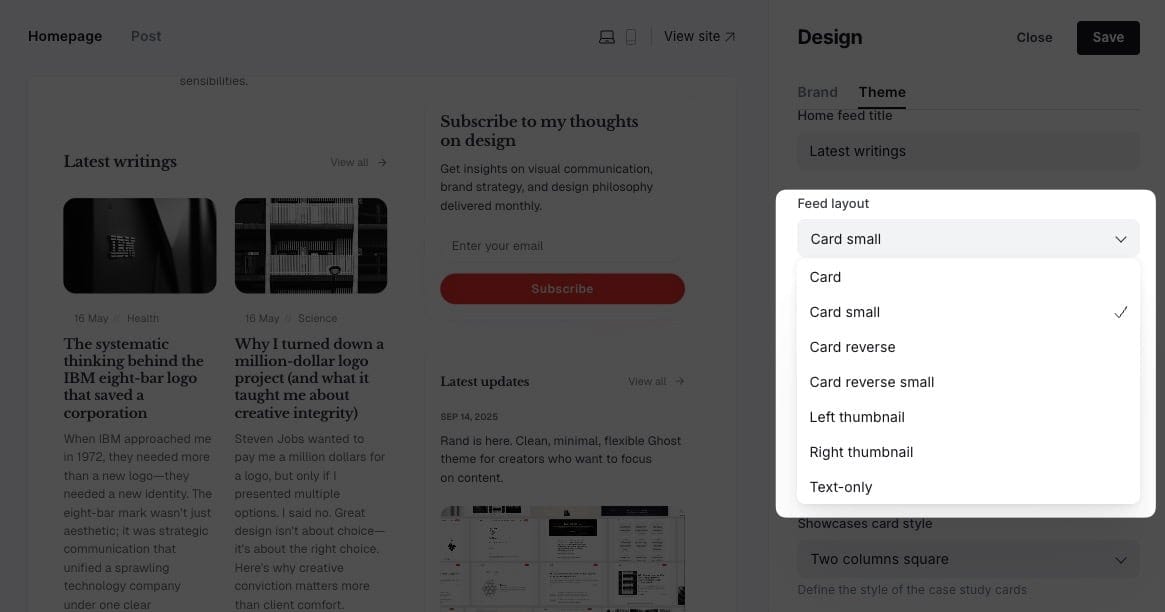
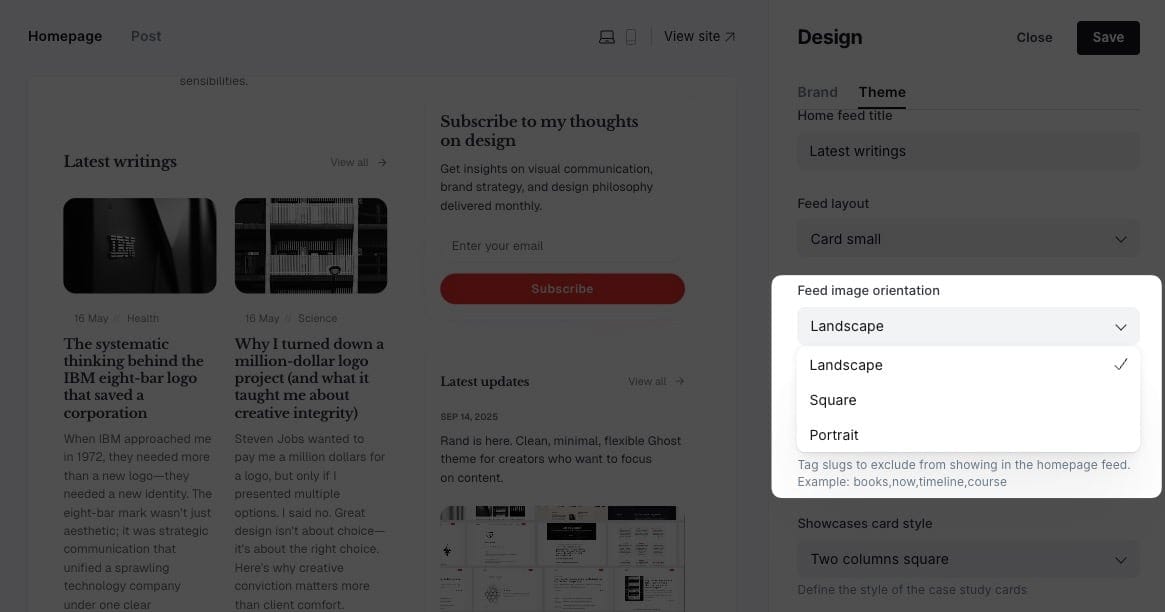
You can set your favorite style at Ghost admin > Settings > Design & branding > Theme > Feed layout and Feed image orientation for the post image ratio (Landscape, Square, Portrait).
The post style will be applied across the site, including the homepage, blog, and related posts under the post detail page.
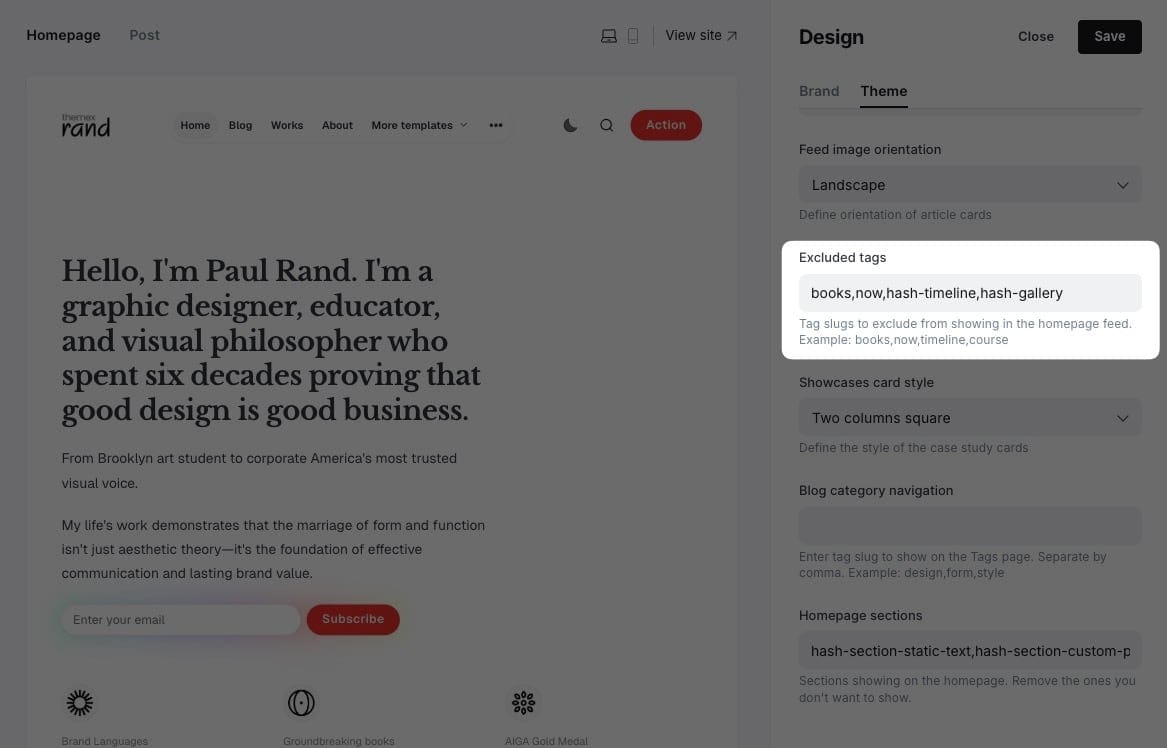
Exclude Posts from Blog Feed on Homepage
Control which posts appear on your homepage feed by excluding specific tags.
Step-by-Step to Exclude Posts
- Go to Settings > Design & branding > Theme
- Find Excluded tags
- Enter tag slugs separated by commas (e.g.,
internal,draft,private) - Click Save
Posts with these tags won't appear in the homepage feed but remain accessible via direct links or tag pages.
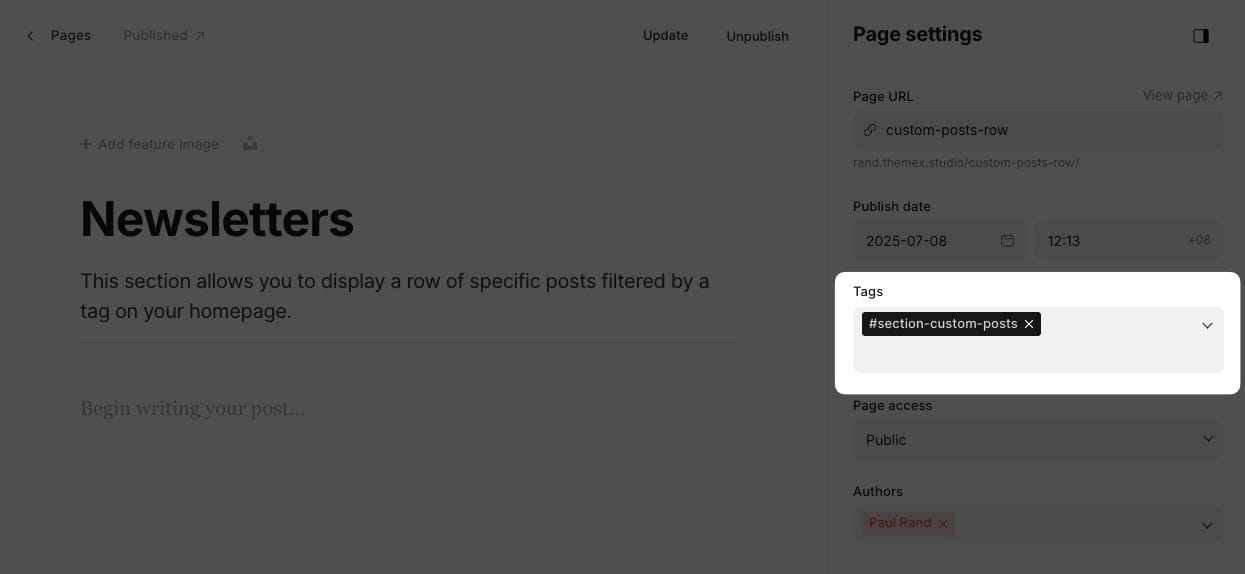
Custom Posts Row Sections
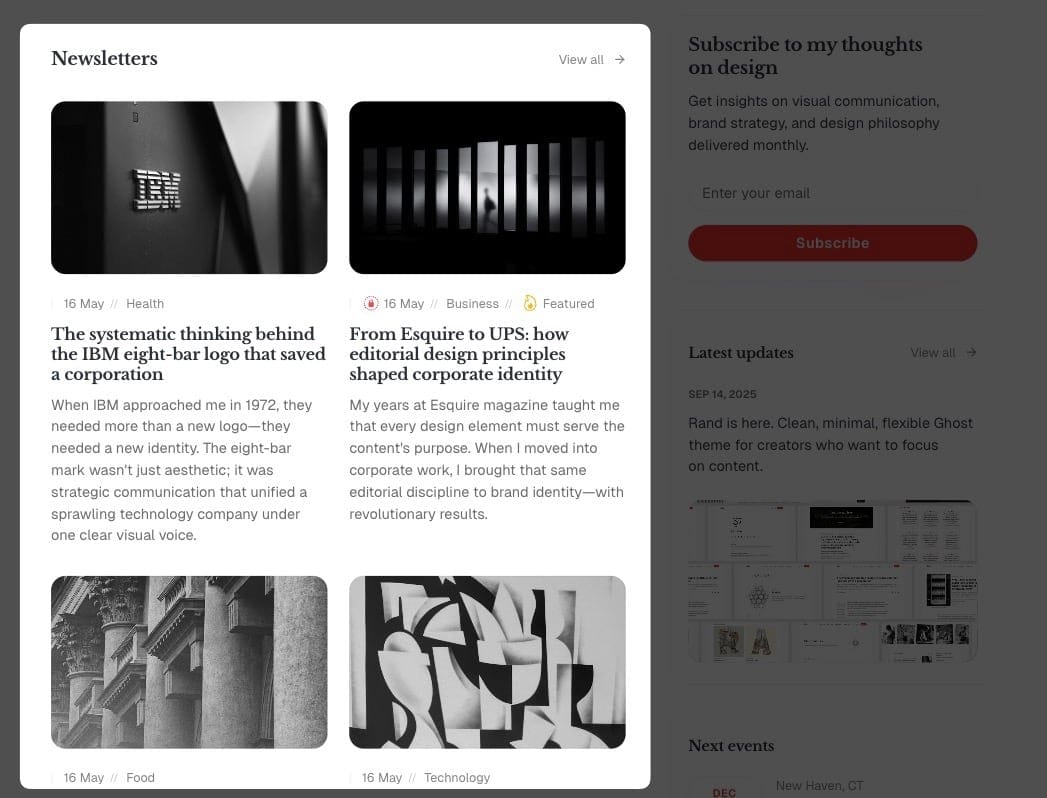
Posts row section
This section allows you to display a row of specific posts filtered by a tag on your homepage.
Step-by-Step to Add Posts Row Sections on Homepage
- In Ghost admin, create a new Page.
- Give it a title; this title will be shown on the homepage.
- In Page settings, add
#section-custom-poststo the Tags input. - In Template dropdown, choose Page Collection (This will create a new page showing those posts)
- Click on X Card and add the tag slug of the posts you want to show in this row on the Homepage. i.e. putting
newsletterif you want to show posts that are tagged asNewsletter - Publish and preview it on your homepage.
Logos Section
Sometimes you want to show some kind of social proof, and a logo board can help achieve that.

Step-by-Step to Add Logo Board
- In the Ghost admin page, go to Pages > click on New page.
- Enter the title of the page. This title will be the section title on the homepage.
- Upload all logos you want to show on the homepage. Note: Don't add any line breaks above, between, or after the Images. It will create some odd alignment.
- In the Page Setting sidebar, add a tag named:
#section-logos. - Publish and check your homepage.
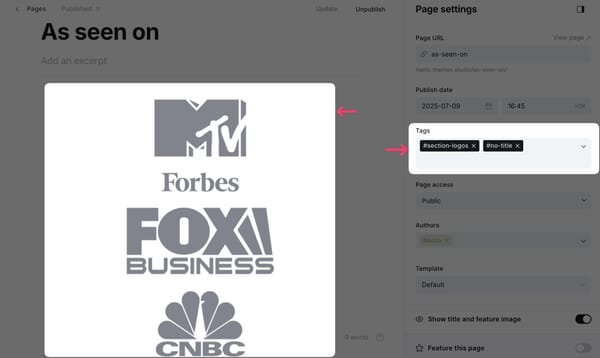
Example of logo section settings
☝️ If you want to hide the section title, add #no-title tag.
Showcase Section
Highlight showcase items, such as portfolio pieces, case studies, or featured projects.
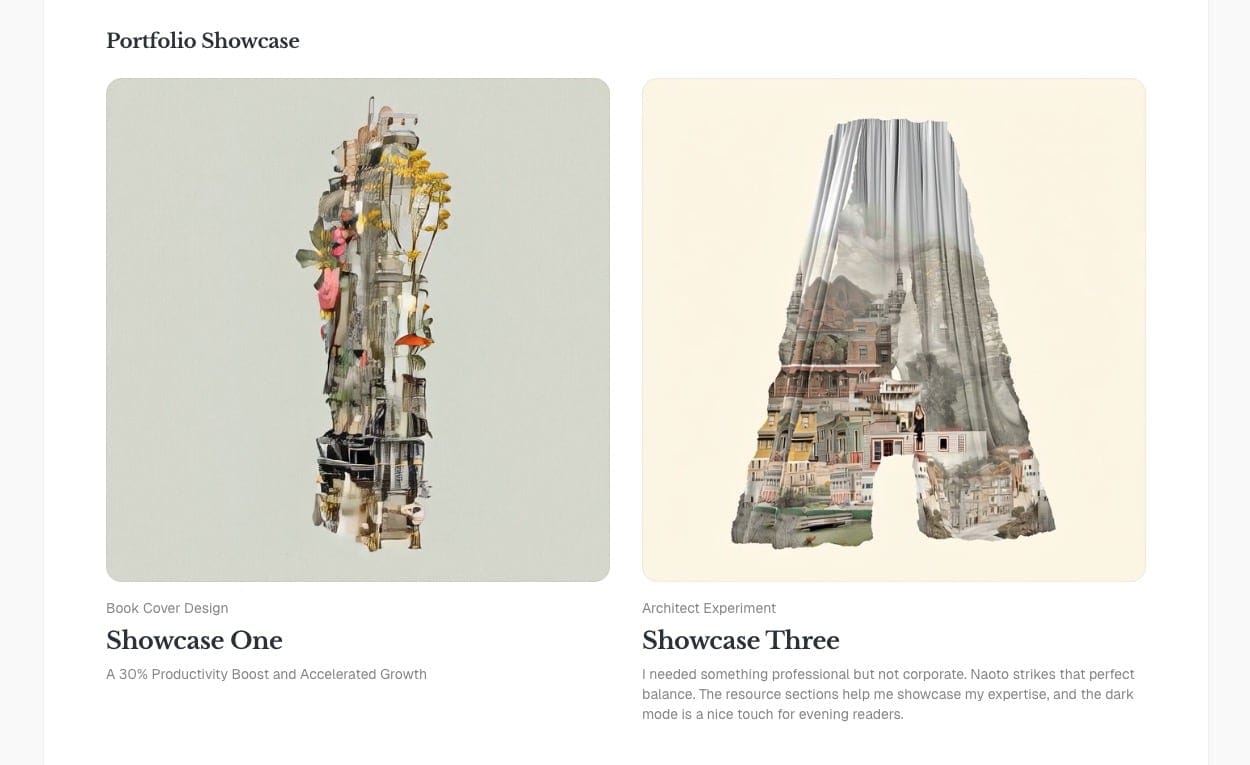
Showcase section
Step-by-Step to Add Showcase Section on Homepage
- In Ghost admin, create a new page.
- Give it a title, any name. This title will be the title shown on the homepage and the blog page.
- [⭐️ Important] Add
#section-showcaseto Tags input.- To show posts instead of pages, add
#source-poststag as well.
- To show posts instead of pages, add
- [⭐️ Important] Click on X Card → X description field, add the tag slug of the page you want to show as the content. This will 'filter' specific Pages for this section. i.e. putting
worksif you want to show pages that are tagged asWorks - If you want to create separate page showing Showcase content, select Page Collection in Template — the View all link will lead to this page.
- View all link options
- By default, View all will link to that separate page
- If you want it to lead to a different page, add the new URL in Meta data → Canonical URL
- If you want to hide it, add
#no-titleto the Tags
Publish.

Now the showcase section is visible on the homepage. Next, to add content for that section.
Add Showcase Items
Step-by-Step to Add Showcase Items
- In the Ghost admin page, go to Pages (or Posts if you added
#source-posts) > click on New page. - Enter information for this project. Page title as the title, Excerpt as the project description, X description as eyebrow sub-header (above the title), and featured image.
- Tag the page with the tag you used in the X description field in the showcase section page above (e.g. Works)
- (Optional) If you want to lead visitors to an external site, add the URL at Metadata > Canonical URL. By default, the link will lead to the Page detail.
- (Optional) If you want to use the video as the thumbnail, paste the video URL to Facebook card → Facebook description
- Publish.
- Repeat the same steps to create different content blocks for the showcase section.
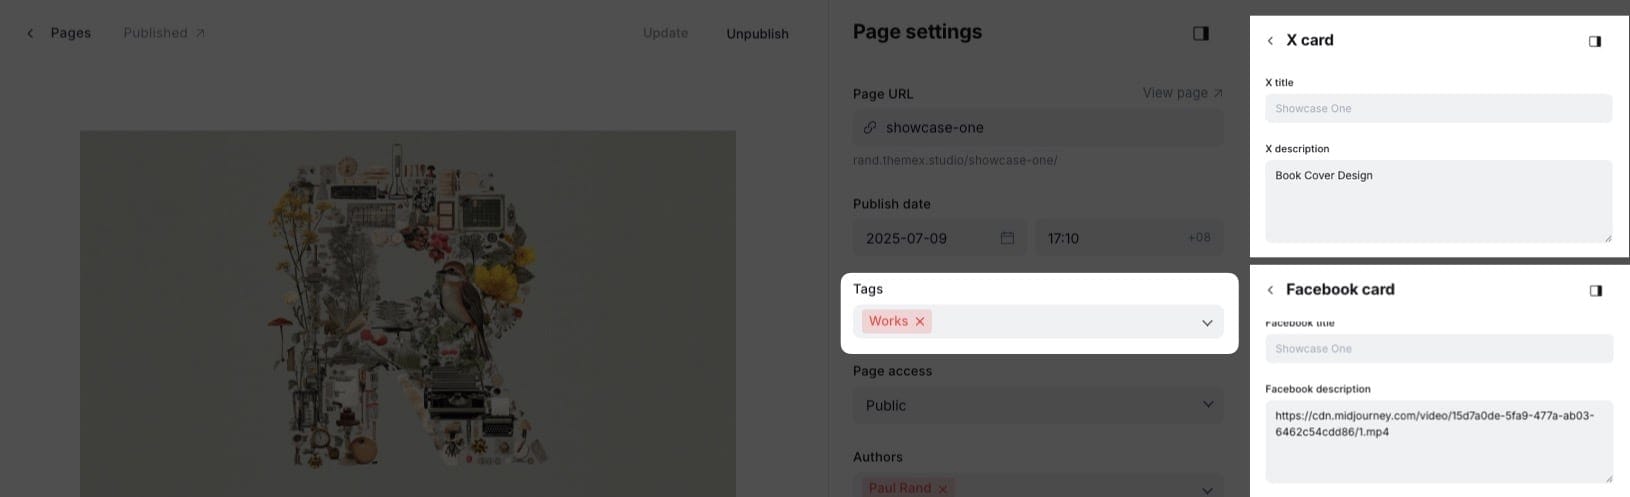
Example of showcase item settings
Change Showcase Layout
For the showcase card, the theme provides some showcase item layout options.
- Go to Ghost admin > Settings > Design & branding > Theme > Showcase card style
- Select your choice.
- Save.
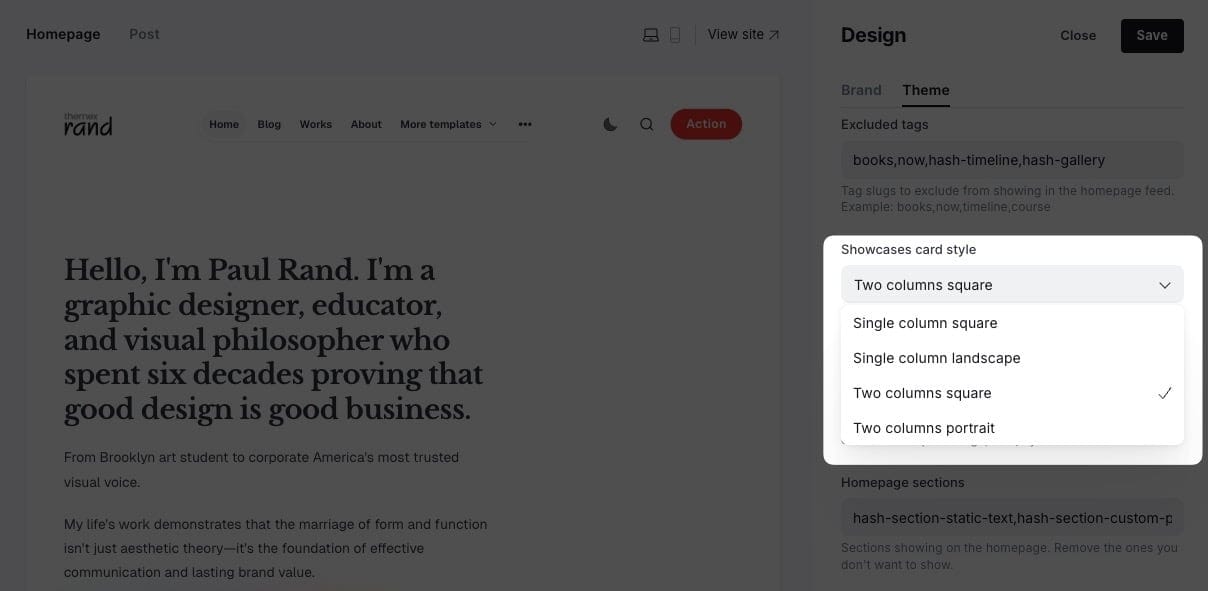
Showcase layout options
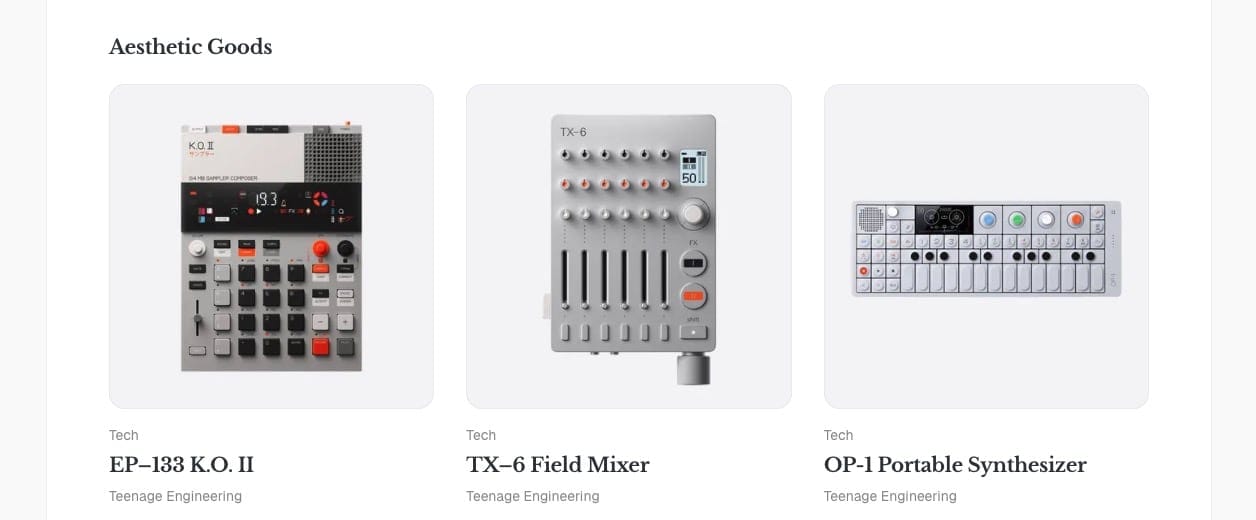
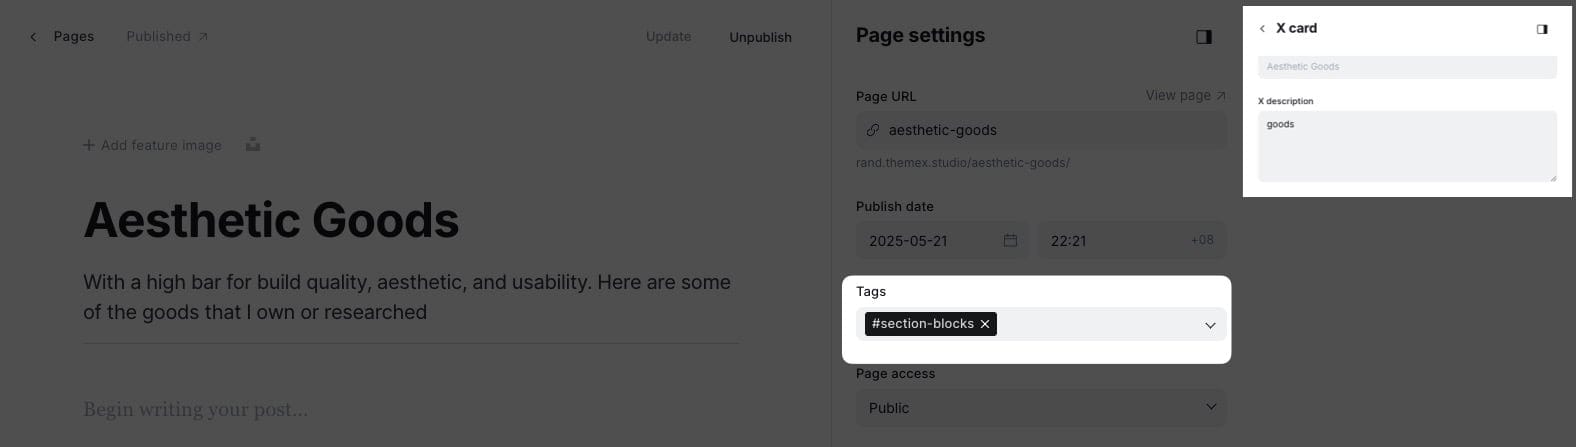
Blocks Sections
Display a grid of blocks, such as products, features, or services.
Setup Blocks Section
- In Ghost admin, create a new page.
- Give it a title; this title will be shown on the homepage and the blog page.
- [⭐️ Important] Add
#section-blocksto Tags input. To show posts instead of pages, add#source-poststag as well. - [⭐️ Important] Click on X Card → X description field, add the tag slug of the page you want to show as the content. This will 'filter' specific pages for this section. You can filter multiple tags. i.e. putting
goods,health,foodif you want to show pages that are tagged asGoods, Health, Food - If you want to create separate page showing Showcase content, select Page Collection in Template — the View all link will lead to this page. 6. View all link options
- By default, View all will link to that separate page
- If you want it to lead to a different page, add the new URL in Meta data → Canonical URL
- If you want to hide it, add
#no-titleto the Tags
- Publish.
☝️ To find the exact tag slug, go to Tags in the Ghost admin home, click on the tag name, then copy the text in the Slug field.
Repeat these two steps to create different blocks sections on the homepage. You can have as many resource sections as you want.
Add Blocks Content
Refer to Step-by-Step to Add Showcase Items steps. They work the same way.
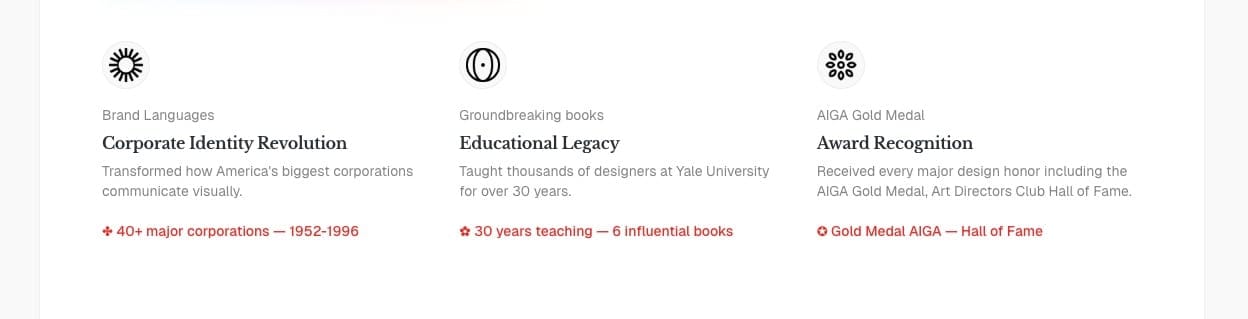
Resource card anatomy
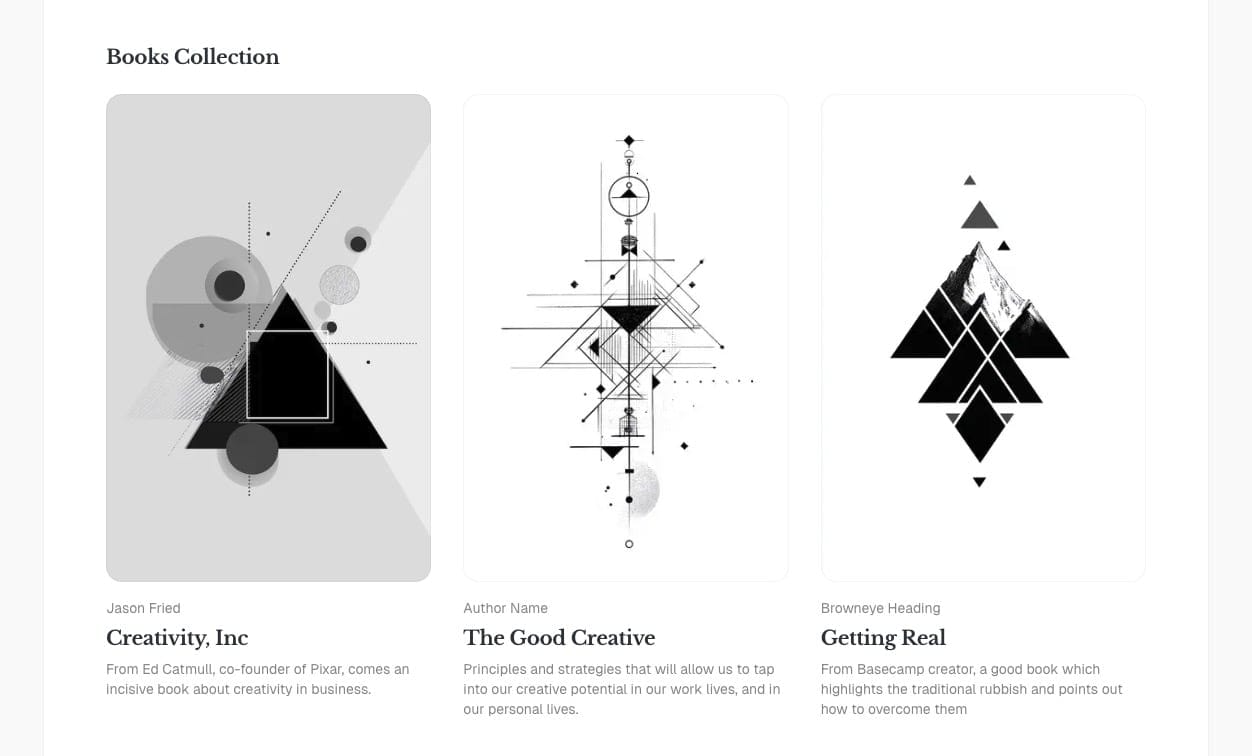
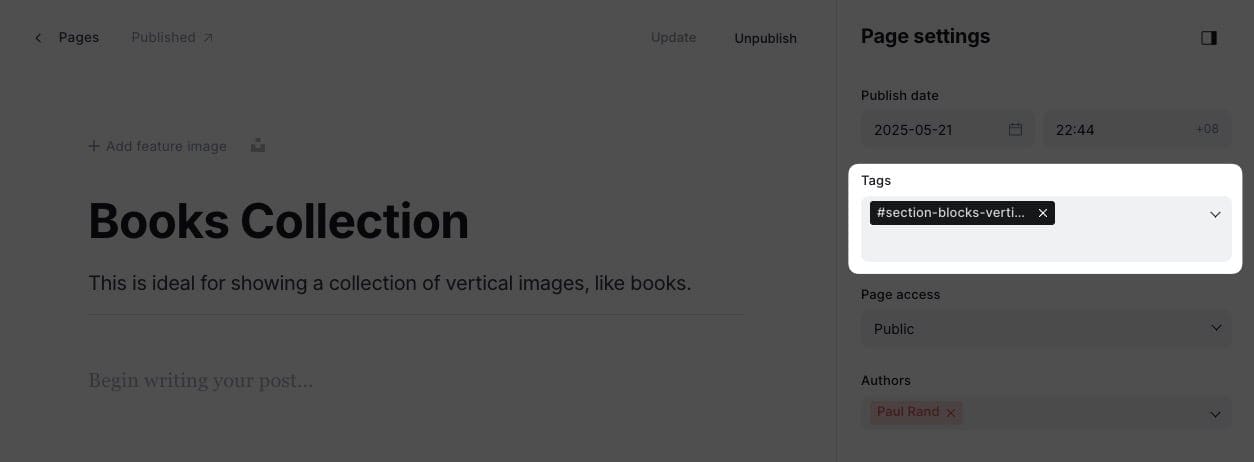
Blocks Vertical Section
Show blocks in a vertical (column) layout, ideal for books or vertical image lists.
Setup Blocks Vertical Section
- In Ghost admin, create a new page.
- Give it a title; this title will be shown on the homepage and the blog page.
- [⭐️ Important] Add
#section-blocks-verticalto Tags input.- To show posts instead of pages, add
#source-poststag as well.
- To show posts instead of pages, add
- [⭐️ Important] Click on X Card → X description field, add the tag slug of the page you want to show as the content. This will 'filter' specific pages for this section. You can filter multiple tags. i.e. putting
book,health,foodif you want to show pages that are tagged asBook, Health, Food - If you want to create separate page showing Showcase content, select Page Collection in Template — the View all link will lead to this page. 6. View all link options
- By default, View all will link to that separate page
- If you want it to lead to a different page, add the new URL in Meta data → Canonical URL
- If you want to hide it, add
#no-titleto the Tags
Publish.
Add Blocks Vertical Content
Refer to Step-by-Step to Add Showcase Items steps. They work the same way.
Vertical resource card anatomy
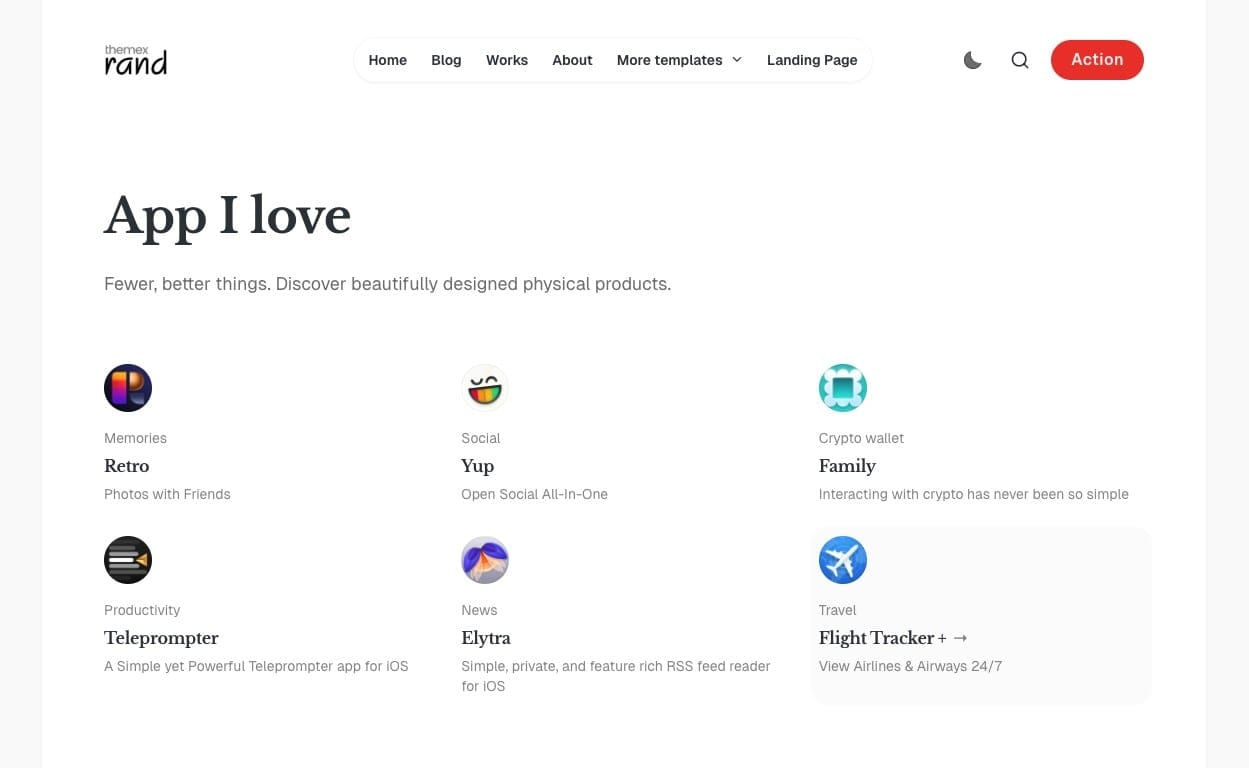
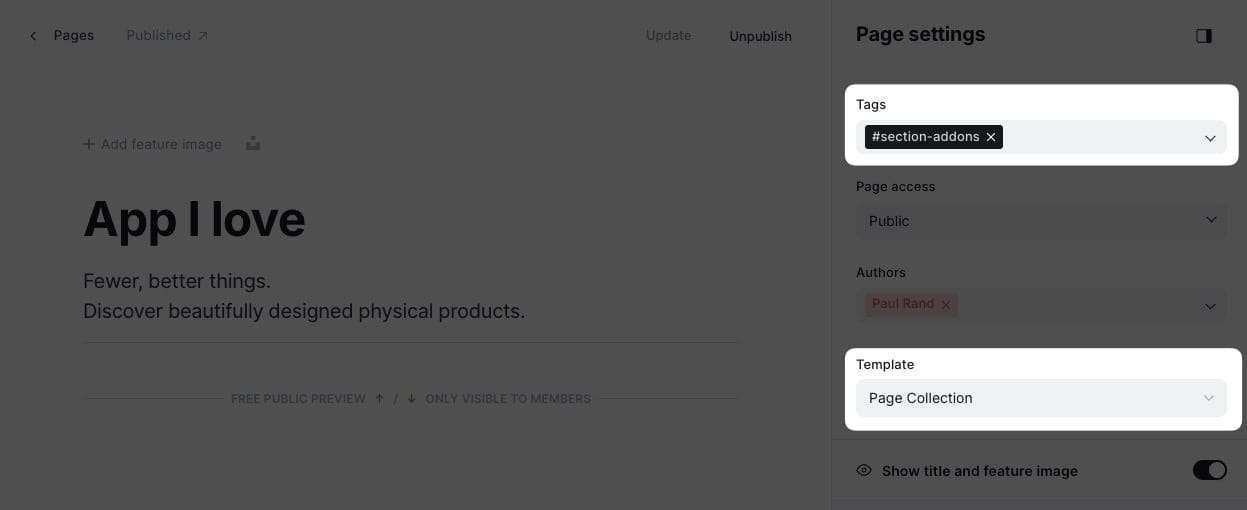
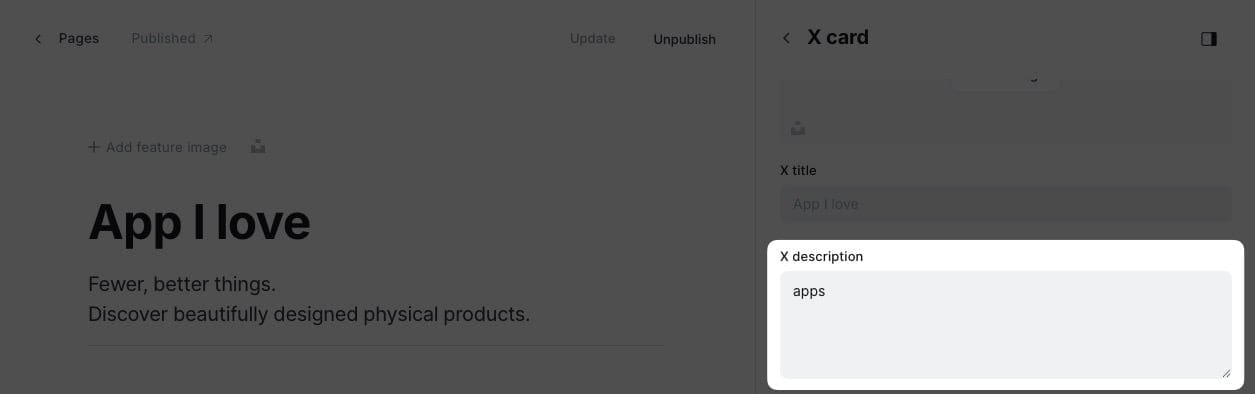
Addons Section
Showcase a grid of add-ons, plugins, or resources you want to highlight. Great for listing tools, downloads, or partner products.

Addons section
Setup Addons Section
- In Ghost admin, create a new page.
- Give it a title; this title will be shown on the homepage and the blog page.
- [⭐️ Important] Add
#section-addonsto Tags input. To show posts instead of pages, add#source-poststag as well. - [⭐️ Important] Click on X Card → X description field, add the tag slug of the page you want to show as the content. This will 'filter' specific pages for this section. You can filter multiple tags. i.e. putting
book,health,foodif you want to show pages that are tagged asBook, Health, Food - If you want to create separate page showing Showcase content, select Page Collection in Template — the View all link will lead to this page. 6. View all link options
- By default, View all will link to that separate page
- If you want it to lead to a different page, add the new URL in Meta data → Canonical URL
- If you want to hide it, add
#no-titleto the Tags
Publish.
Addons section settings
Add Addons Content
Refer to Step-by-Step to Add Showcase Items steps. They work the same way.
Addons card anatomy
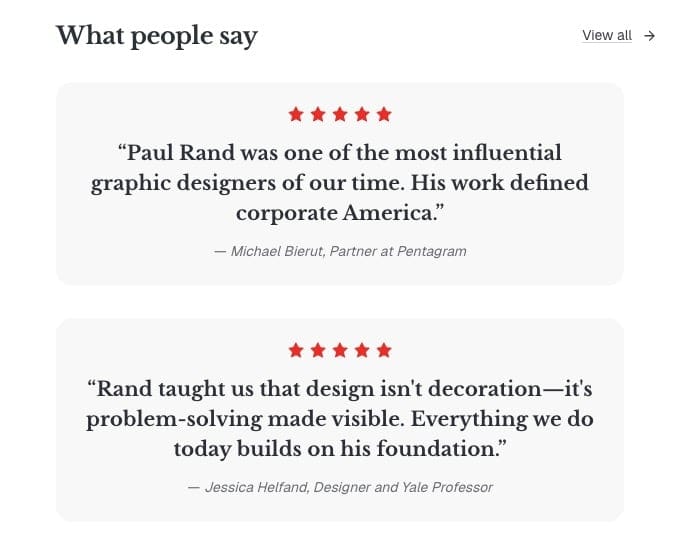
Testimonials Section
Display testimonials from your users, clients, or partners.
To add a testimonials section, create a new page, give it a title, then add an internal tag #section-testimonials in the page settings.
Testimonials section
Step-by-Step to Add Testimonial Section
- In the Ghost admin page, go to Pages > click on New page.
- Enter the title of the page. This title will be the section title on the Homepage.
- [⭐️ Important] Add
#section-testimonialsto the Tags field. - In the page content, add a new Product card. You can find this card by clicking on the + icon on the left side of the editor or by typing
/productin the editor, then select the Product option. - On the product card, fill in the details:
- Title is the testimonial main text.
- Description shows a person's name and job title.
- Image as a profile picture.
- Stars as a rating.
- Add more Product cards to add more testimonials.
- Publish.
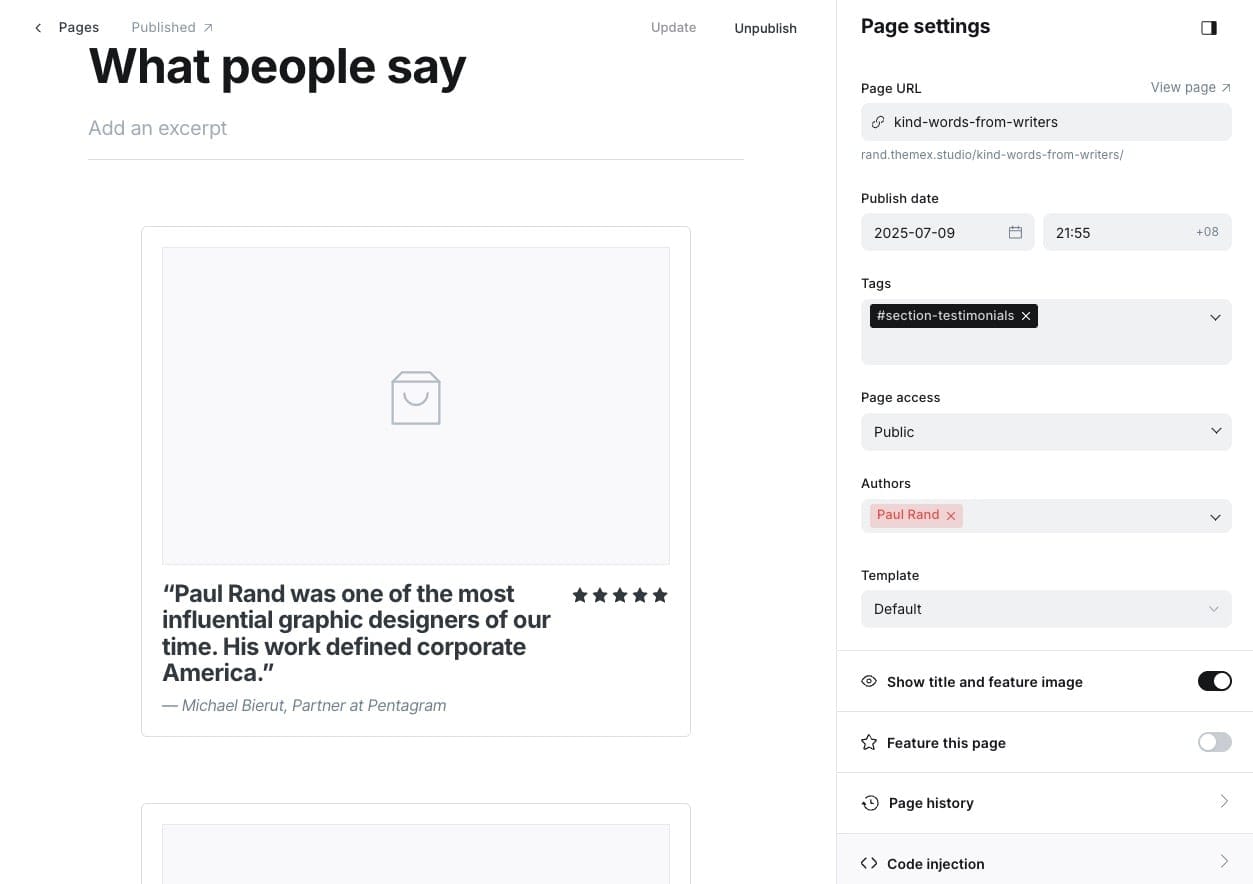
Example of testimonial section settings
Static Text Section
The static text section is useful for adding custom text on the homepage, such as your services, working principles, or values.

Static text section
Step-by-Step to Add Static Text Section
- In the Ghost admin page, go to Pages > click on New page.
- Enter the title of the page. This title will be the section title on the Homepage.
- [⭐️ Important] Add
#section-static-textto the Tags field. - In the page content, add a new Product card. You can find this card by clicking on the + icon on the left side of the editor or by typing
/productin the editor, then select the Product option. - On the product card, fill in the title, description, image, and link (optional).
- Add more Product cards to add more static text cards.
- Publish.
☝️ If you want to hide the section title, add #no-title tag.
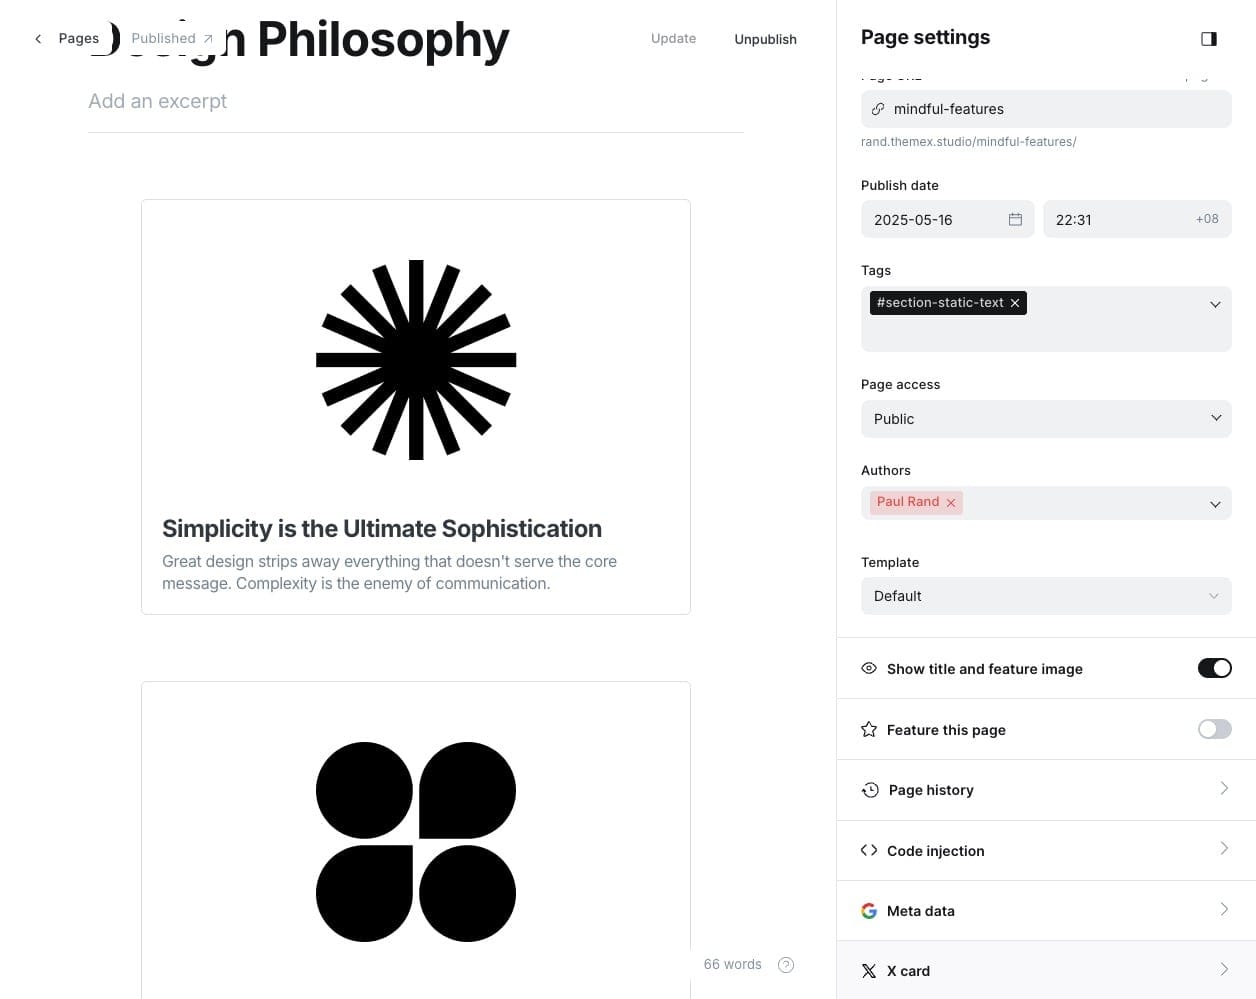
Example of static text section settings
If you want to create multiple sections using Static text, create a new page and repeat the same steps above.
Static Banner Section
If you prefer to show static images instead of text, you can use the static banner section.

Step-by-Step to Add Banner Text Section
- In the Ghost admin page, go to Pages > click on New page.
- Enter the title of the page. This title will be the section title on the Homepage.
- [⭐️ Important] Add
#section-static-bannerto the Tags field. - In the page content, add a new Product card. You can find this card by clicking on the + icon on the left side of the editor or by typing
/productin the editor, then select the Product option. - On the product card, fill in the title, description, image, and link (optional).
- Add more Product cards to add more static text cards.
- Publish.
☝️ If you want to hide the section title, add #no-title tag.
Experiences Section
List your work experiences, milestones, or career highlights.
Work experiences section
Step-by-Step to Add Experiences Section
- In Ghost admin, create a new Page.
- Enter the title of the page. This title will be the section title on the Homepage.
- [⭐️ Important] Add
#section-experiencesto the Tags input. - In the page content, add a new Product card. You can find this card by clicking on the + icon on the left side of the editor or by typing
/productin the editor, then select the Product option. - On the product card, fill in the title, description, image, and link (optional).
- Add more Product cards to add more static text cards.
- Publish.
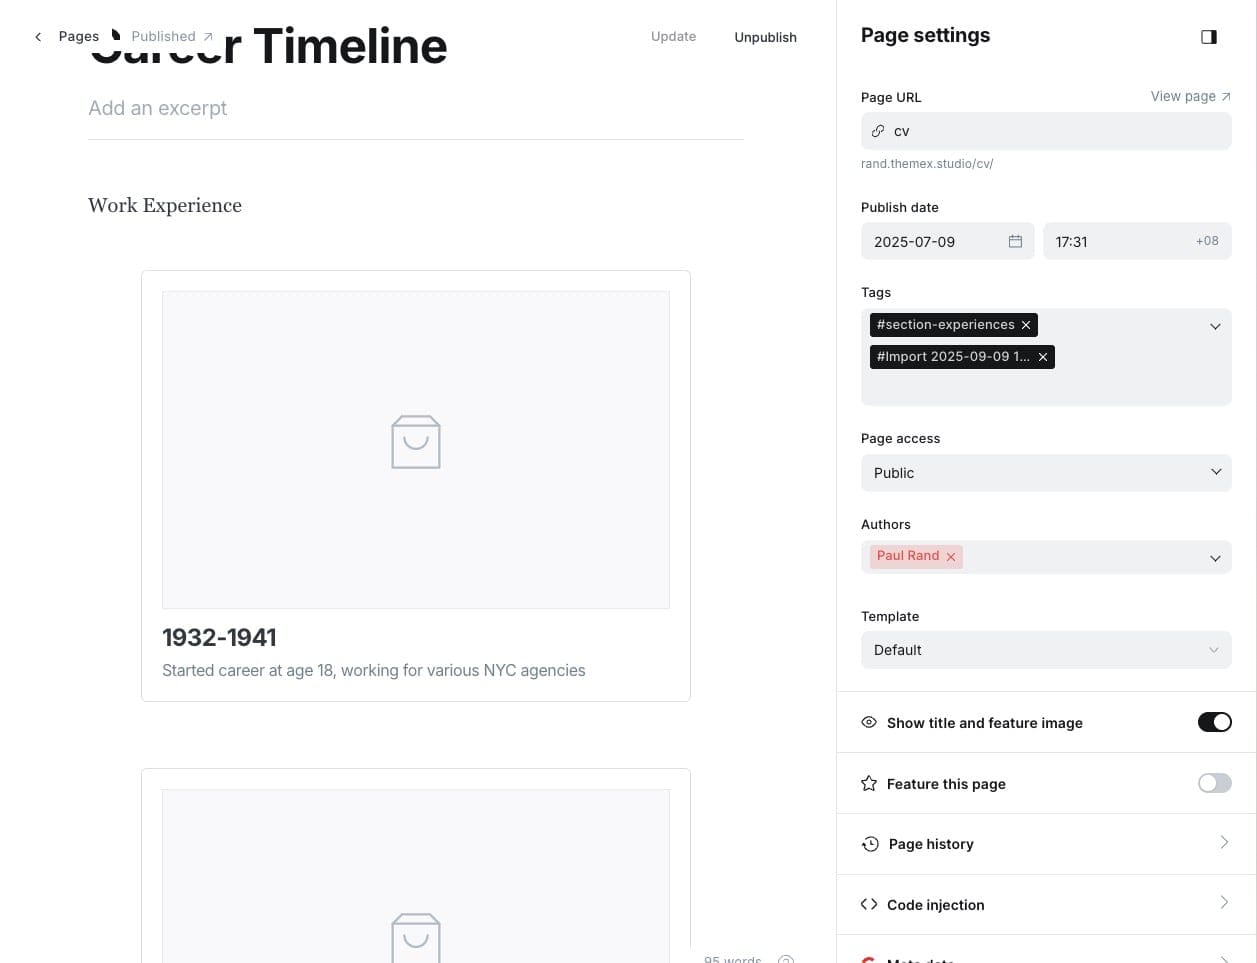
Example of work experiences section settings
Now Section
Display the latest post tagged as "Now" or any custom tag — perfect for sharing what you're currently focused on.
Now section
Step-by-Step to Add Now Section
- In Ghost admin, create a new Page.
- Give it a title; this title will be shown on the homepage.
- [⭐️ Important] Add
#section-nowto the Tags input. - [⭐️ Important] Click on X Card → X description field, add the tag slug of the post you want to show as the content. This will 'filter' specific pages for this section. i.e. putting
nowif you want to show pages that are tagged asNow - If you want to create separate page showing Showcase content, select Page Now in Template — the View all link will lead to this page. 6. View all link options
- By default, View all will link to that separate page
- If you want it to lead to a different page, add the new URL in Meta data → Canonical URL
- If you want to hide it, add
#no-titleto the Tags
Publish.
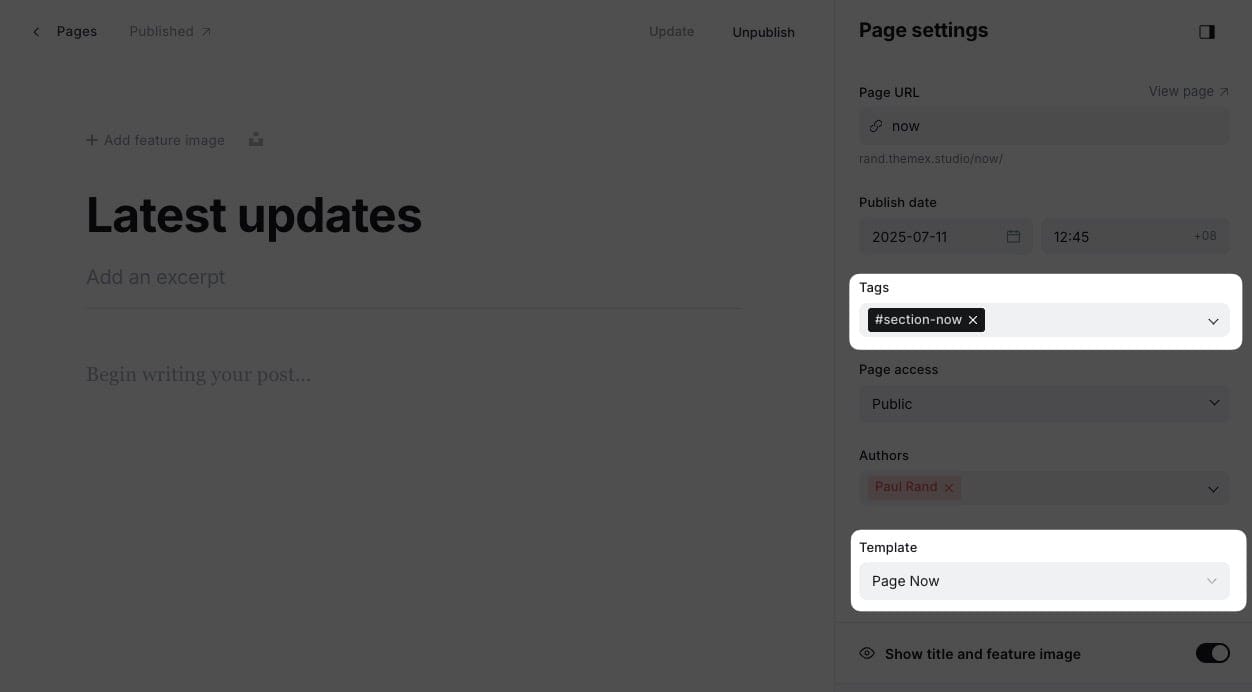
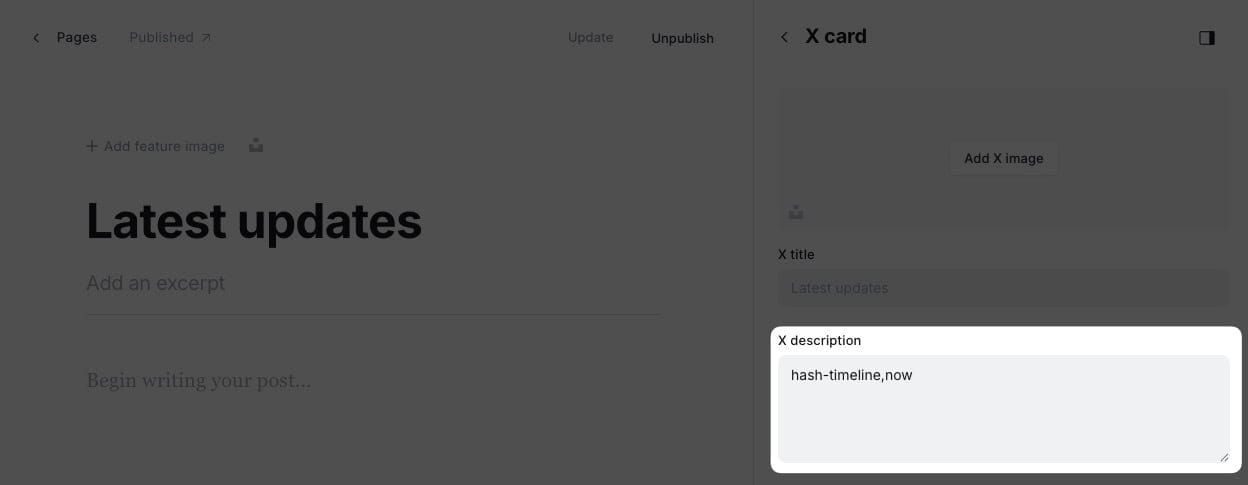
Example of now section settings
Now you need to add Now content:
Step-by-Step to Add Now Content
- In the Ghost admin page, go to Posts > click on New posts.
- Give it any title and add your content (Now section won't display Post title)
- Tag the posts with the tag you used in the X description field in the Now section page above (e.g. Now)
- Publish.
- Repeat the same steps to create different content blocks for the showcase section.
The latest post tagged with "Now" will be displayed in this section.
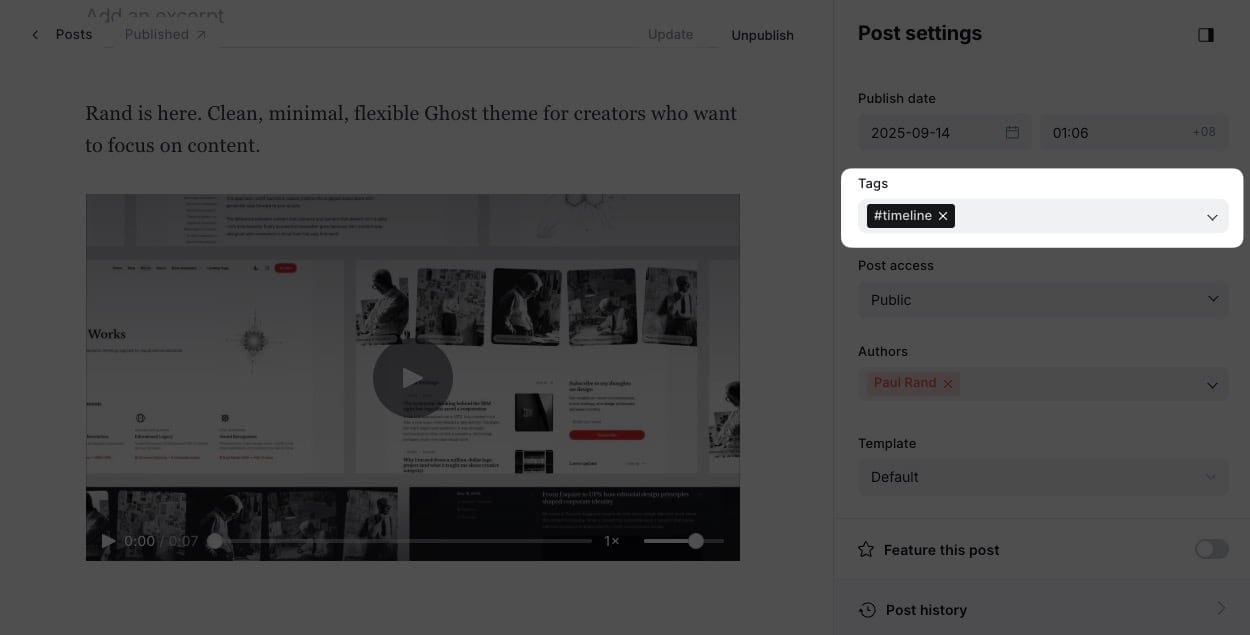
Now content example
Custom Content Section
This section allows you to display any custom content of a specific page on the homepage.
Content block section
Step-by-Step to Add Custom Content Section
- In Ghost admin, create a new Page.
- Give it a title; this title won't be shown on the homepage.
- Add
#section-custom-contentto the Tags input. - Publish.
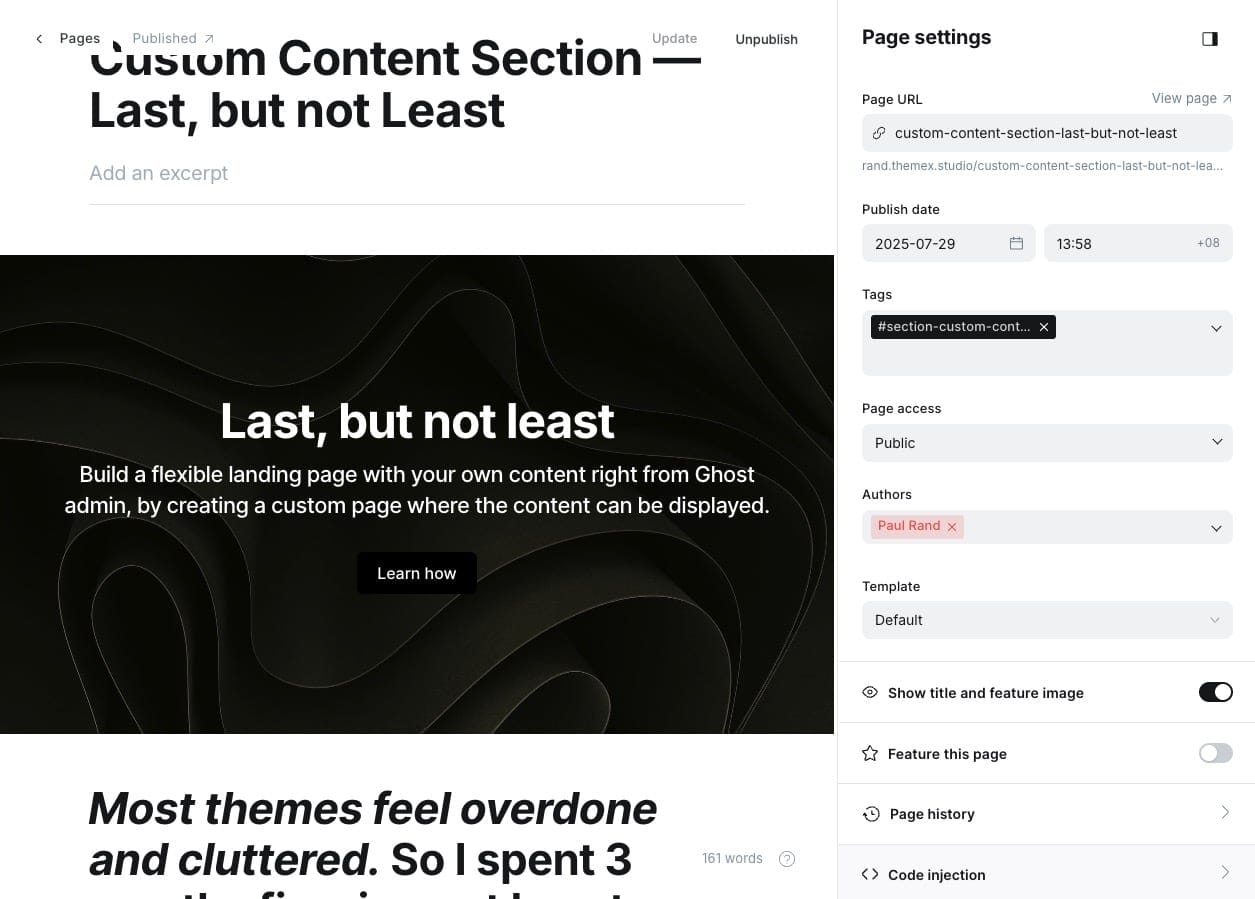
Example of content block section settings
Event Calendar Section
This section shows a list of upcoming events with dates.
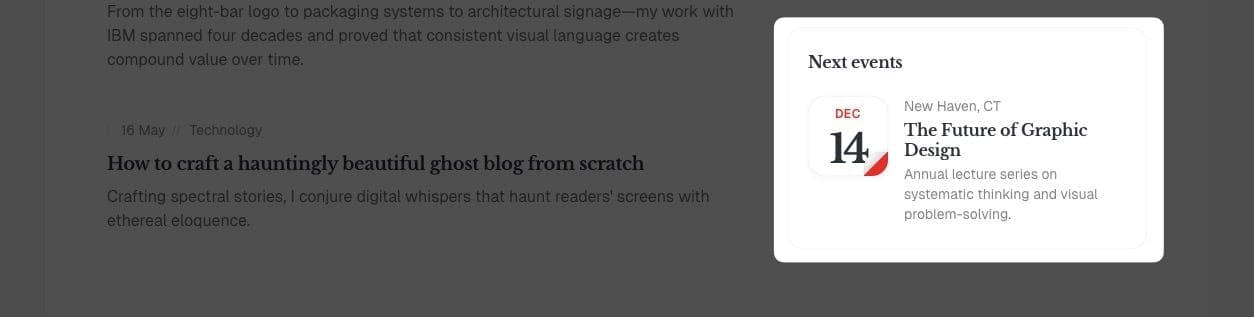
Event calendar section
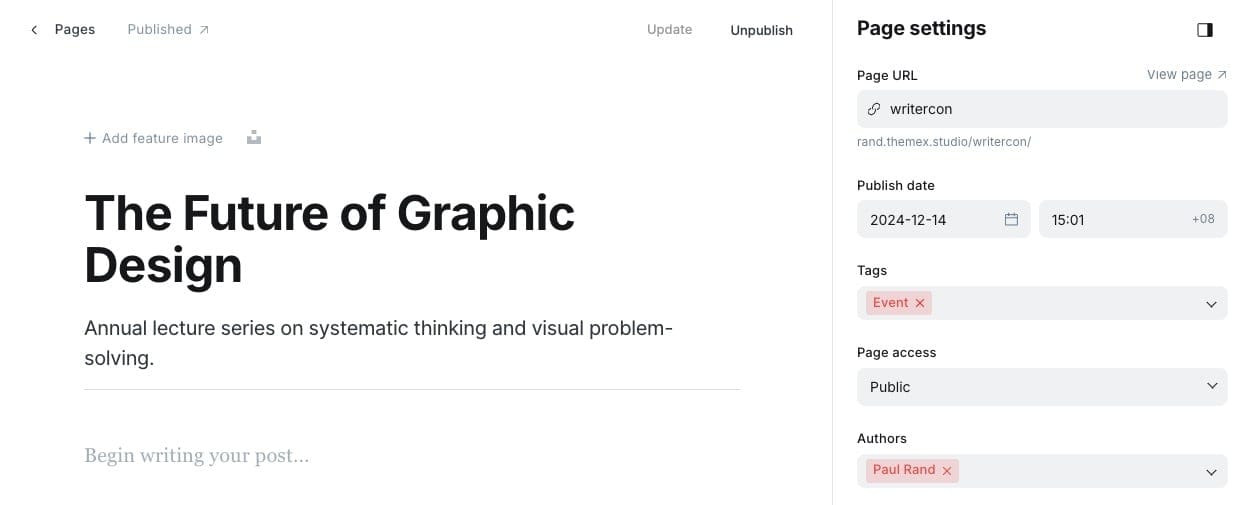
Step-by-Step to Add Event Calendar Section
- In Ghost admin, create a new page.
- Give it a title, any name. This title will be the title shown on the homepage and the blog page.
- [⭐️ Important] Add
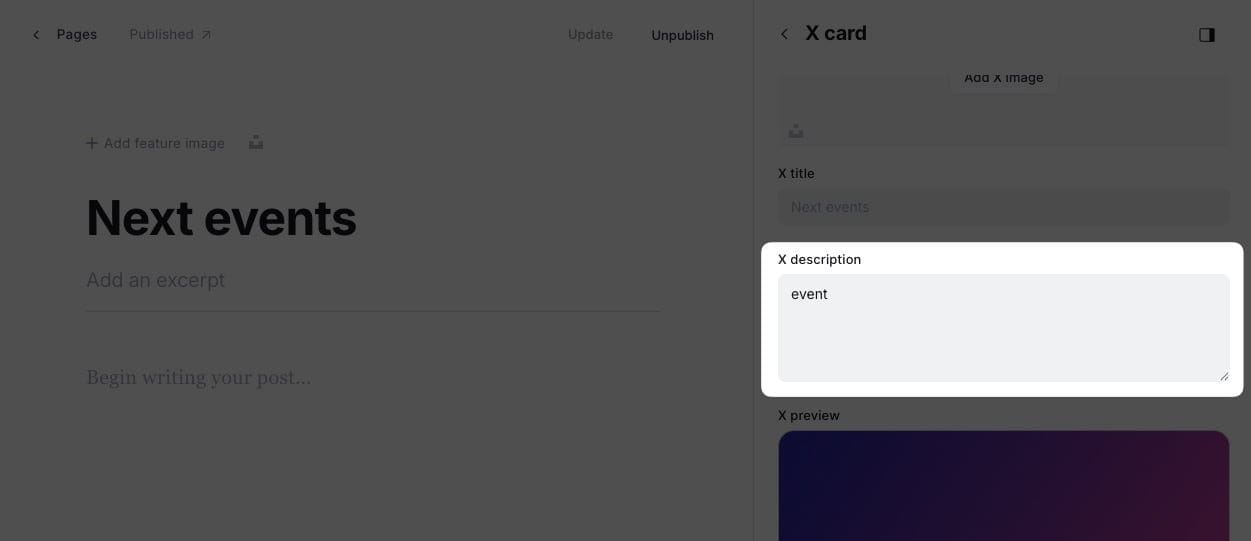
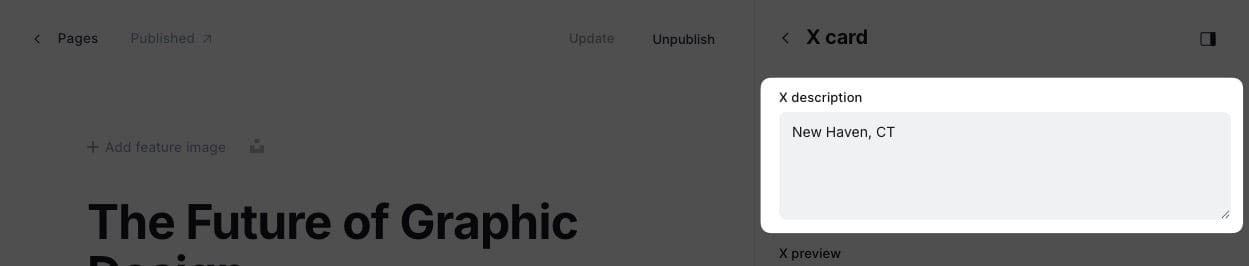
#section-eventsto Tags input. - [⭐️ Important] Click on X Card → X description field, add the tag slug of the page you want to show as the content. This will 'filter' specific Pages for this section. i.e. putting
eventif you want to show pages that are tagged asEvent - If you want to create separate page showings Showcase content, select Page Collection in Template — the View all link will lead to this page.
- View all link options
- By default, View all will link to that separate page
- If you want it to lead to a different page, add the new URL in Meta data → Canonical URL
- If you want to hide it, add
#no-titleto the Tags
- Publish.
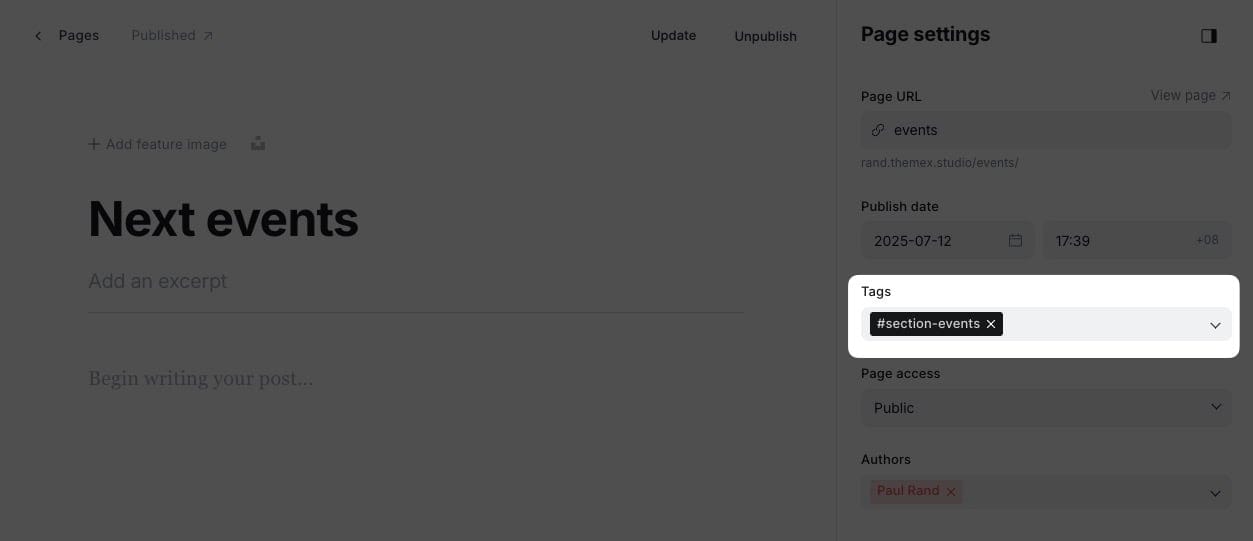
Example of event calendar section settings
Now you need to add Event content:
Event content example
Step-by-Step to Add Event Content
- In the Ghost admin page, go to Pages > click on New page.
- Enter information for this project. Page title as the title, Excerpt as the project description, X description as eyebrow sub-header (above the title).
- Choose event dates by using the Publish date. Since Ghost doesn't support future dates, use this data to display event dates. We only show the date and month, so to show a "future date", use the date from the past year. Example: today is Jul 29, 2025. You have an event in Aug 2, 2025. To show that date, select Aug 2, 2024 as the Publish date.
- If you upload a feature image, it will replace the date as the thumbnail.
- Tag the page with the tag you used in the X description field in the Event page above (e.g. Event).
- (Optional) If you want to lead visitors to an external site, add the URL at Metadata > Canonical URL. By default, the link will lead to the Page detail.
- Publish.
Repeat the same steps to create different content blocks for the showcase section.
Event card anatomy
Other Customizations
Hide Section Title
If you want to hide the section title, add #no-title to the Tags input.
Hide Section Link
If you want to hide the link section, add #no-link to the Tags input.
Other Pages
Blog Page
A blog page displays all your posts in Ghost.
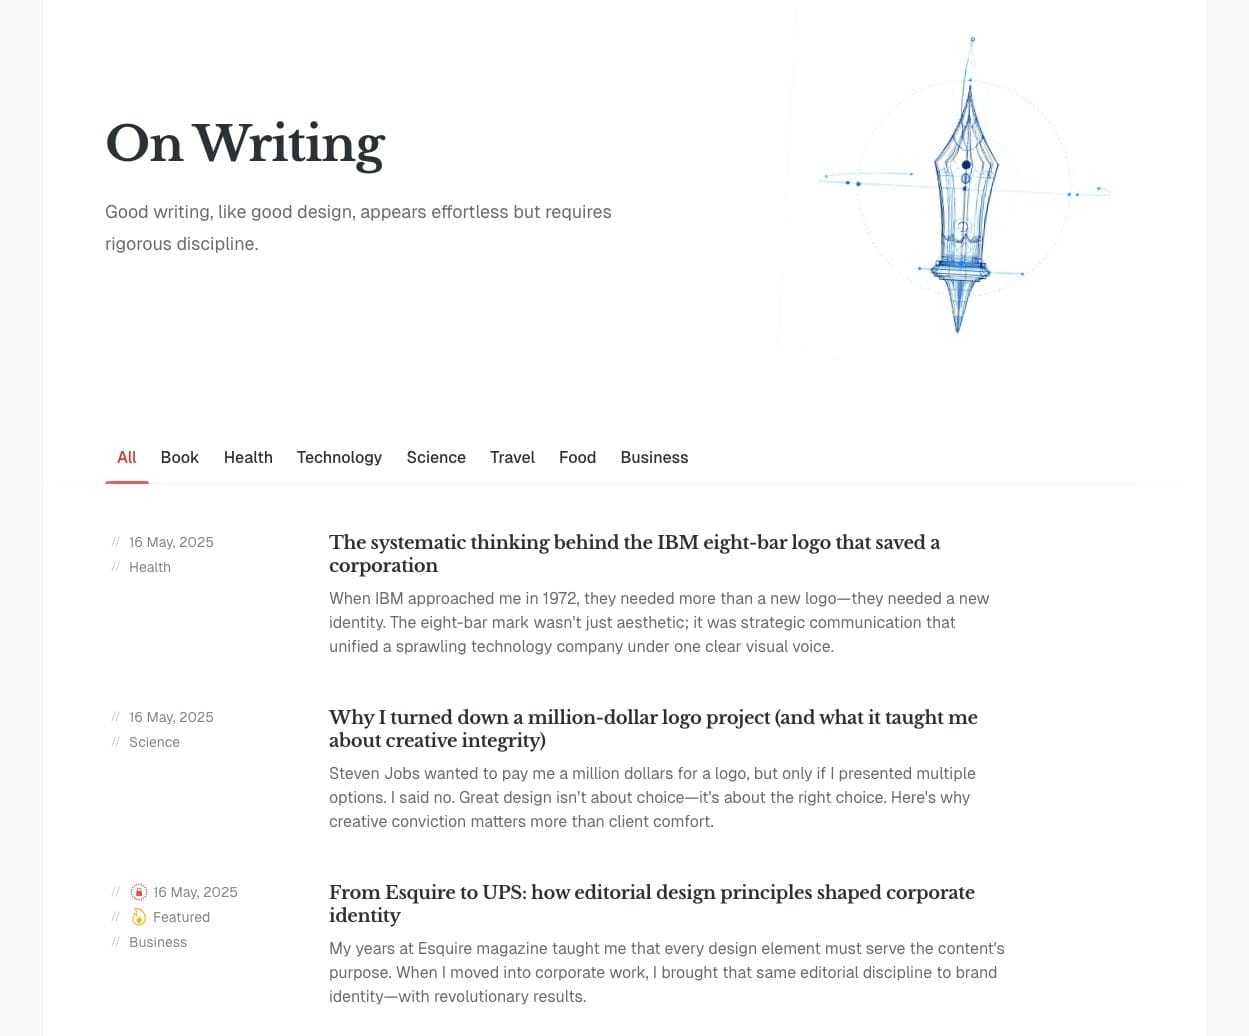
Blog page example
☝️ Important: Ensure you upload the routes.yaml file.
If you've already created a blog section on the homepage, you can skip this step to create a blog page.
Step-by-Step to Create the Blog Page:
- In the Ghost admin page, go to Pages > click on New page.
- Add a title (e.g., 'Blog').
- Add a description or feature image for this page (optional). If you want to add a video, add the video URL to Facebook card > Facebook description
- Click the icon in the top right corner to open the Page settings.
- Ensure the Page URL is
blog. - Click Publish.
Now you have a blog page with the URL yourblog.com/blog.
Blog Category Navigation
By default, the blog category navigation shows the top 5 tags sorted by the number of posts for each tag. You can also define which tags you want to display in the header.
Blog category header
Step-by-Step to Add Custom Items on the Category Header
- From Ghost admin, go to Settings > Design & Branding > Theme.
- In Blog category navigation, enter the slugs for each tag, separated by commas without any whitespace (e.g.,
design,code,mindset). - Click Save.
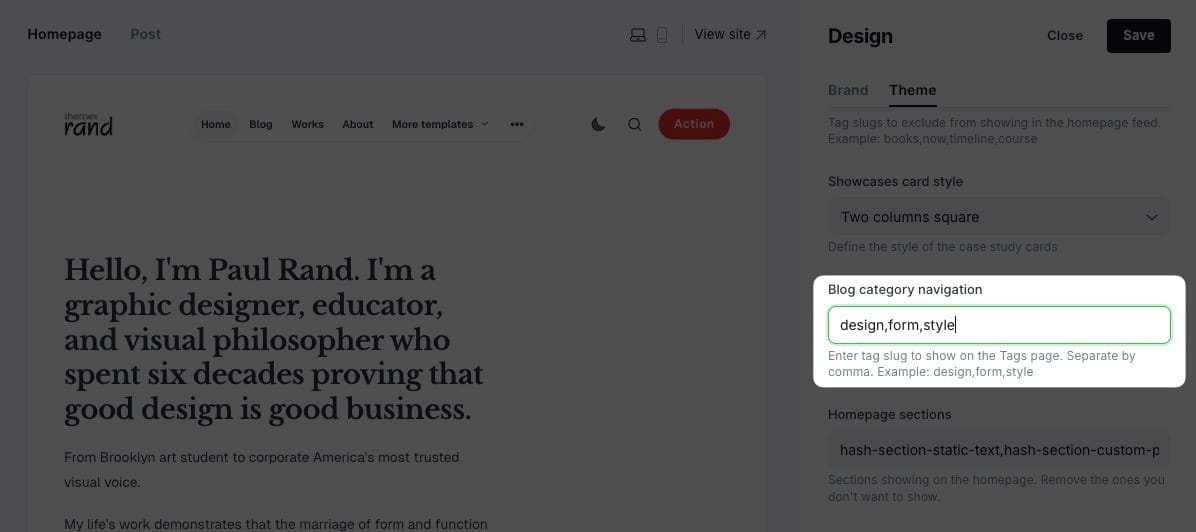
Example of blog category settings
Collection Template
This template lets you create a custom page that shows your own content at the top, followed by a section that automatically displays all pages tagged with one or more tags you specify.
This is perfect for building a focused collection, such as a resource list, a collection of case studies, or a single-topic showcase.
Collection template example 1
Step-by-Step to Create a Collection Page:
- Create a new page in Ghost admin (Pages > New page).
- Add your main content in the editor. This will appear at the top of your landing page.
- In the Page settings (top right corner):
- Tags: Use one of those tags to set the style for the content item:
#section-addons,#section-blocks,#section-blocks-vertical - Template: Select
Page Collectionfrom the Template dropdown. - Twitter Description: Enter one or more tags (comma-separated) you want to show for the section below your main content. For example, entering
resources,downloadswill show all pages tagged with eitherresourcesordownloads.
- Tags: Use one of those tags to set the style for the content item:
- (Optional): You can set the Page access to public or Member only to define who can see the collection.
- Publish your page.
You can create as many collections as you want with the same steps.
Collection page settings
Landing Page Template
This template lets you create a custom page that shows different sections like we show on the home page.
This is perfect for building focused landing pages, such as a resource list, a collection of case studies, or a multi-topic showcase.
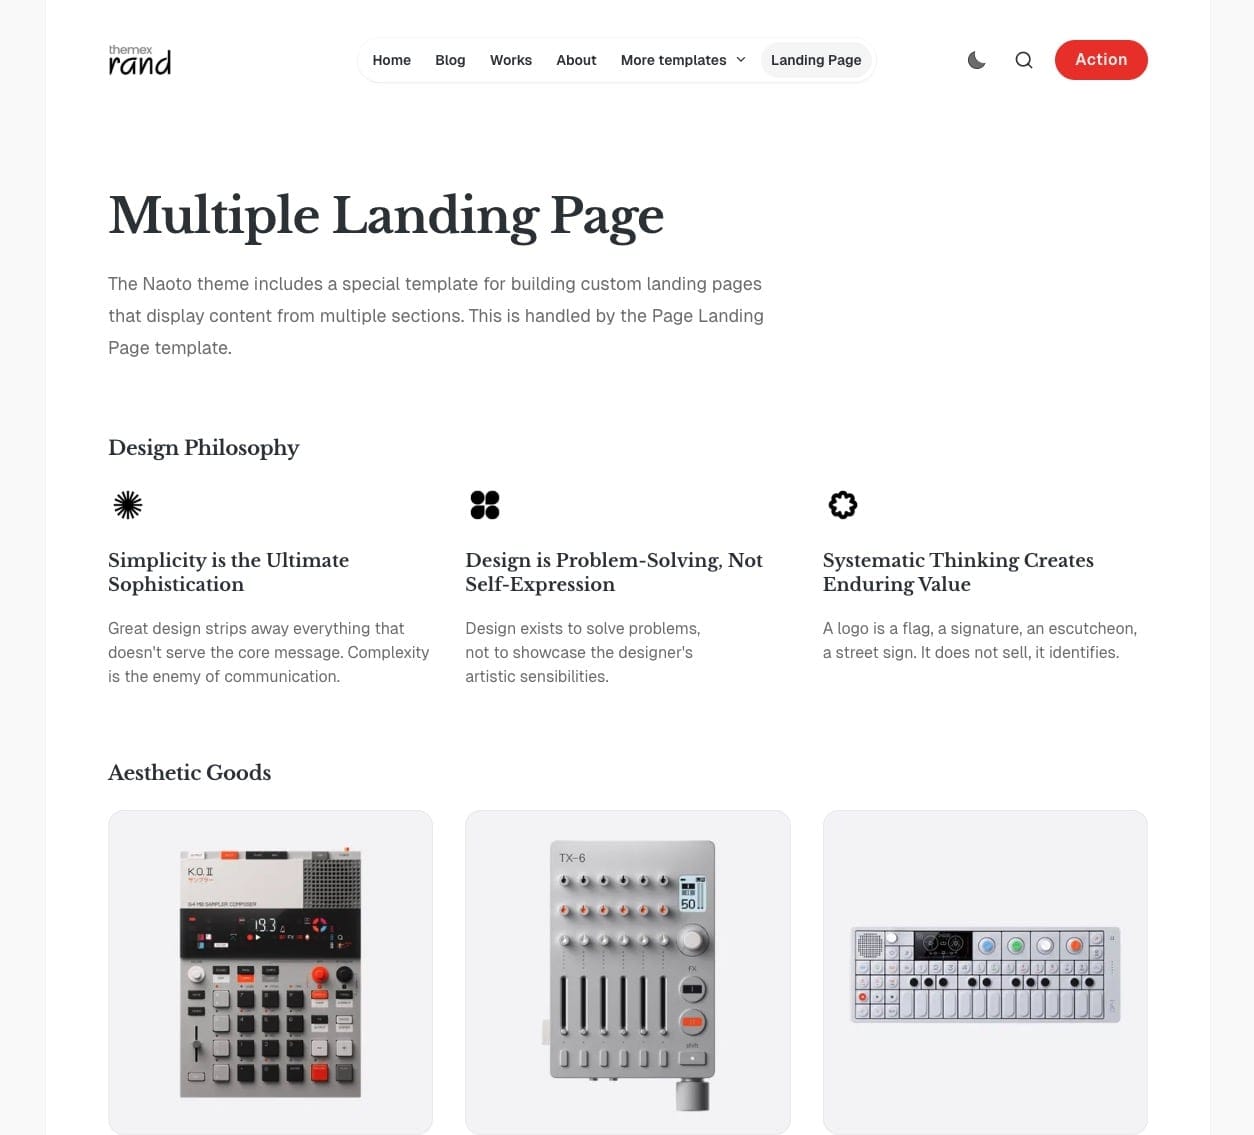
Landing page template example
List of applicable sections and its slug for Landing Page Template
| Section Name | Tag to Use | Description |
|---|---|---|
| Highlights | #section-highlights |
Display a grid of highlighted/featured content or resources. |
| Addons | #section-addons |
Display a grid of add-ons or resources. |
| Blocks | #section-blocks |
Show a grid of blocks (e.g., products, features). |
| Blocks Vertical | #section-blocks-vertical |
Show blocks in a vertical layout. |
| Showcases | #section-showcases |
Highlight showcase items or projects. |
| Testimonials | #section-testimonials |
Display testimonials from users or clients. |
| Experiences | #section-experiences |
List work experiences or milestones. |
| Static Banner | #section-static-banner |
Show a static banner section. |
| Static Text | #section-static-text |
Display a static text section. |
| Custom Posts | #section-custom-posts |
Show a row of specific posts by tag. |
| Now | #section-now |
Display the latest 'Now' post (see Now page instructions). |
| Custom Content | #section-custom-content |
Add custom content or HTML. |
| Events | #section-events |
List events or event cards. |
| Logos | #section-logos |
Display a logo wall or list of logos. |
Step-by-Step to Create a Landing Page
- Create a new page in Ghost admin (Pages > New page).
- Add your main content in the editor. This will appear at the top of your landing page.
- In the Page settings (top right corner):
- Template: Select
Page Landing Pagefrom the Template dropdown. - Twitter Description: Enter one or more tags (comma-separated) of sections you want to show. For example, entering
hash-section-addons,hash-section-blockswill show two sections that the pages tagged with eitherhash-section-addonsorhash-section-blocks.
- Template: Select
- (Optional): You can set the Page access to public or Member only to define who can see the collection.
- Publish your page.
You can create as many collections as you want with the same steps.
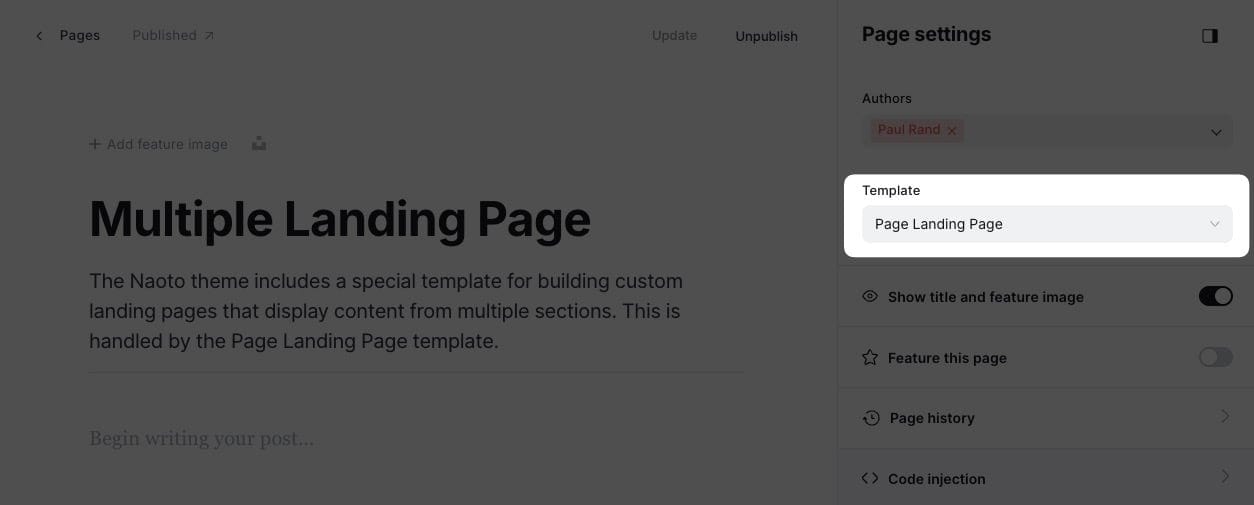
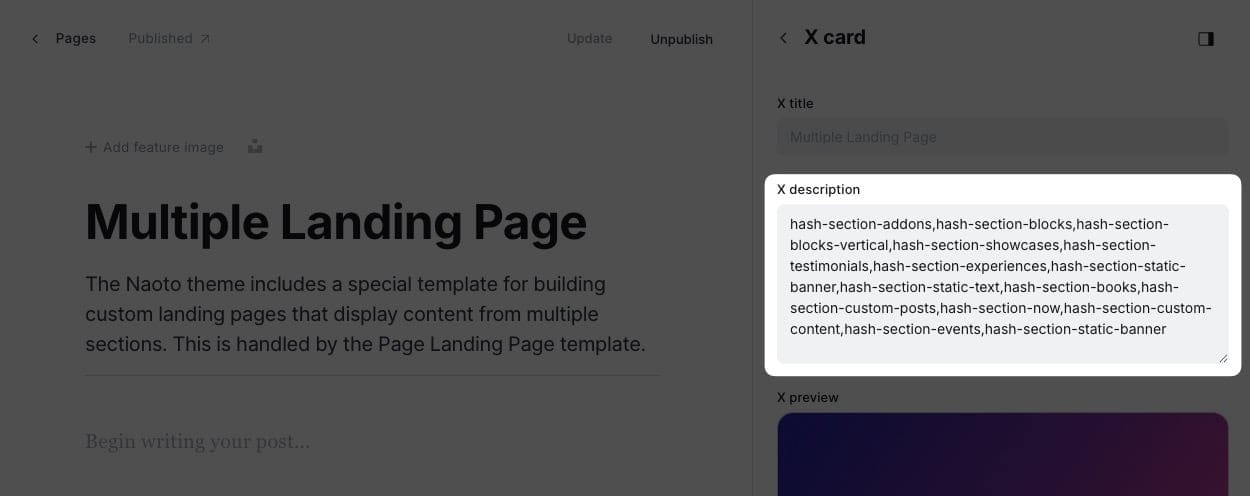
Landing page settings
Timeline Template
Timeline shows content of posts filtered by tags.It shows the newest posts first. It's ideal for showing your milestones by time for timelines.
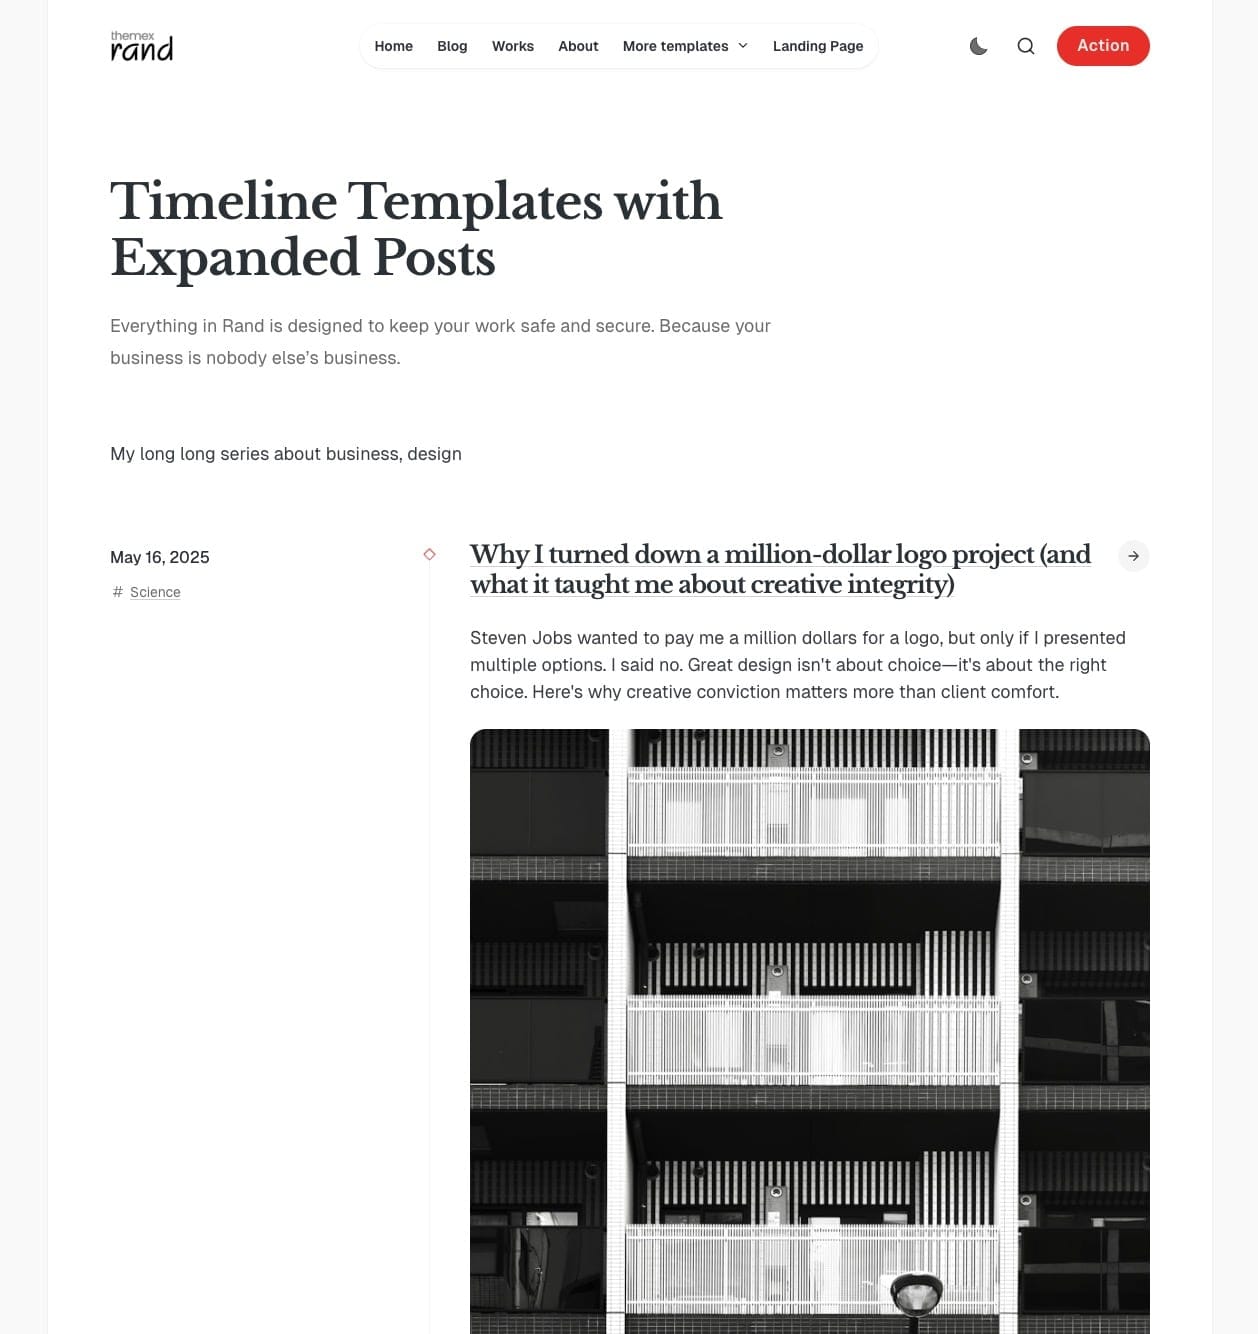
Timeline template example
Step-by-Step to Create a Timeline Page
- Create a new page in Ghost admin (Pages > New page).
- Add a title (e.g., "My Timeline" or the name of your collection).
- Add an introduction or overview in the content editor (optional).
- In Page settings:
- Set the Template to
Page TimelineorPage Timeline Minimal. Timeline Minimal will show the feature image and the excerpt of the post, while Timeline shows the whole content of the post. - In X Description, enter the tag slug that all posts in your series will use (e.g.,
timeline).
- Set the Template to
- Publish your page.
- Tag each post you want to include in the timeline with the same tag you entered in X Description.
Following these steps, the page will display all the posts tagged as timeline and sort them by publish time, newest first.
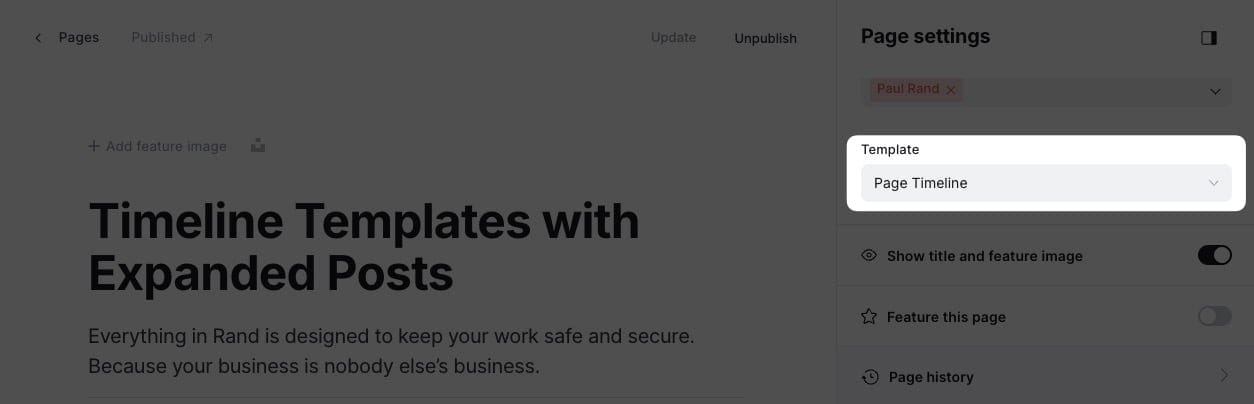
Timeline page settings
About Page Template
The About page template is specifically designed for creating compelling personal or company about pages. It features a unique layout that combines your content with a portrait image and social links, perfect for profiles.
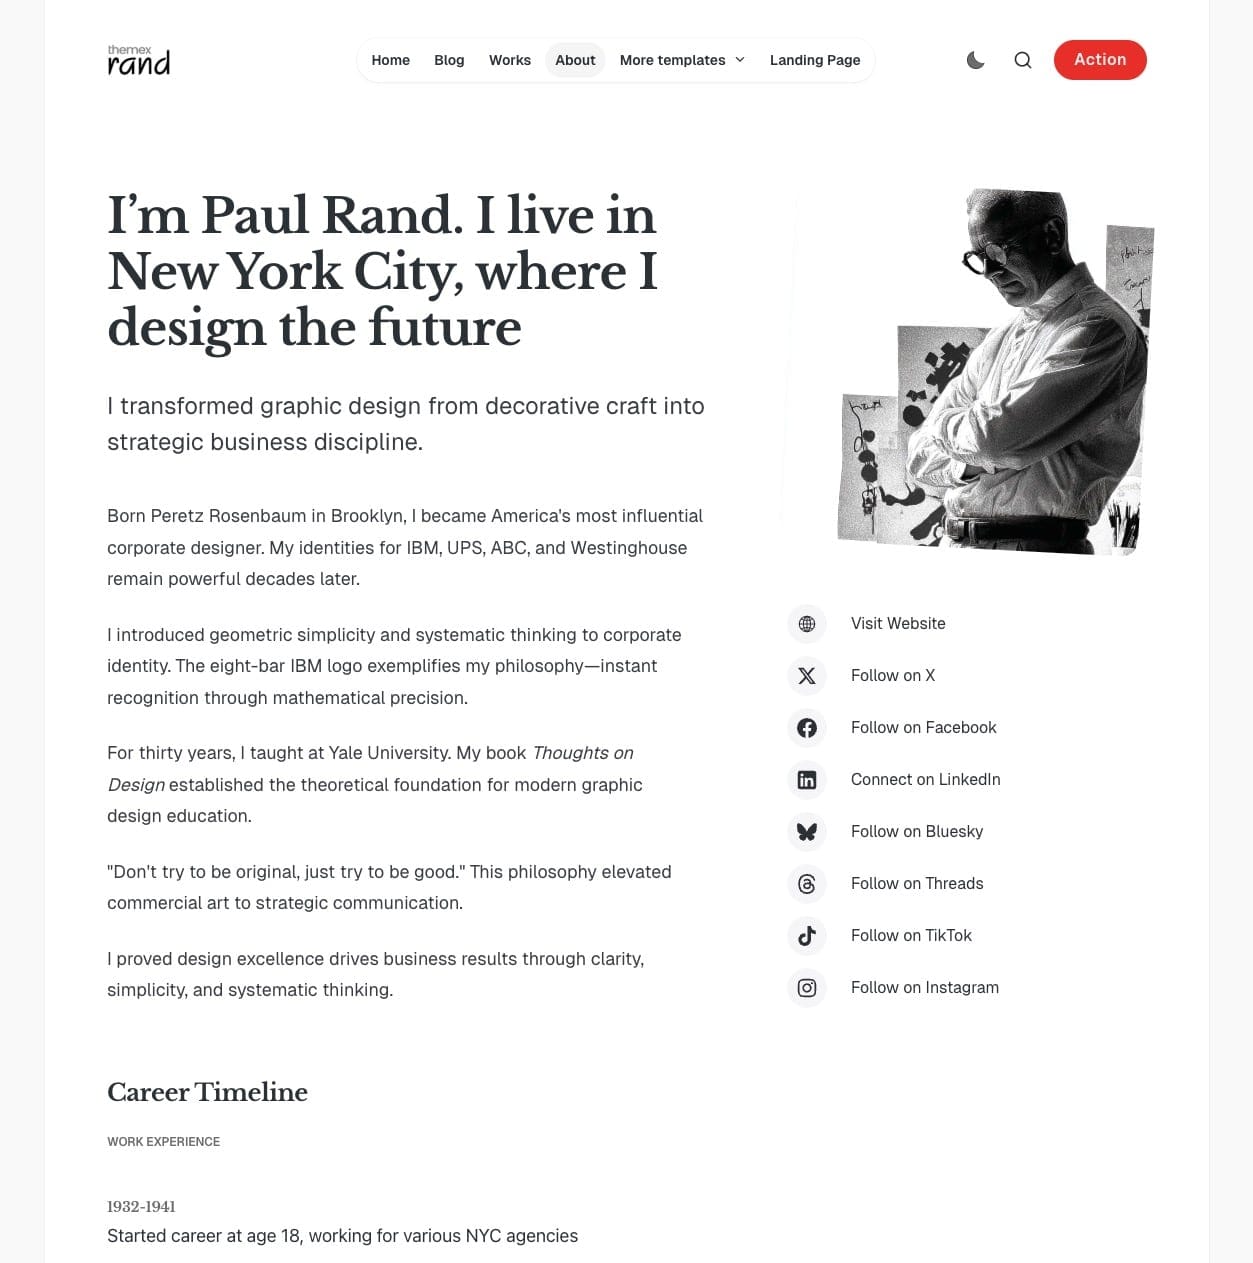
About page template example
Step-by-Step to Create an About Page
- Create a new page in Ghost admin (Pages > New page).
- Add your title, excerpt and featured image
- Add your main content in the editor - this will appear in the left column.
- In Page settings:
- Set the Template to
Page Aboutfrom the Template dropdown. - (Optional) In Twitter Description, add tags to include dynamic content sections from other pages.
- Set the Template to
- Add author information - the template automatically displays social links for the first author added to the page.
- Publish your page.
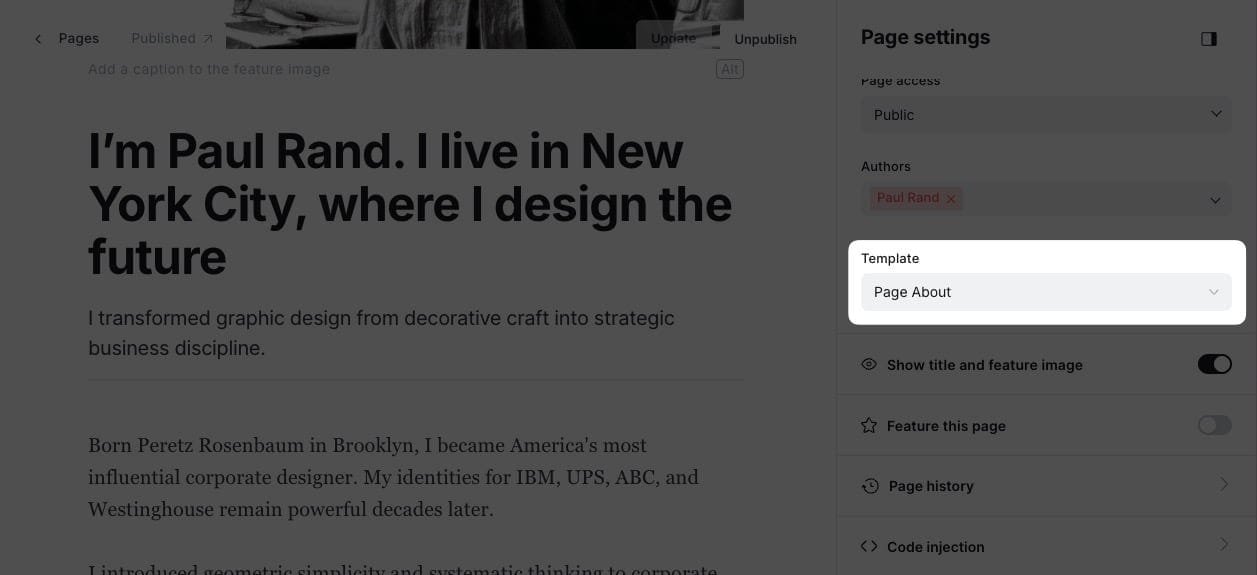
About page settings
Adding Social Links
The About template automatically displays social media links for the page's author:
- Go to Settings > Staff in Ghost admin.
- Select the author whose social links you want to display.
- Add social media URLs in the corresponding fields (Website, Twitter, Facebook, LinkedIn, etc.).
- Save your changes.
The social links will appear vertically aligned below the portrait image.
Dynamic Content Sections
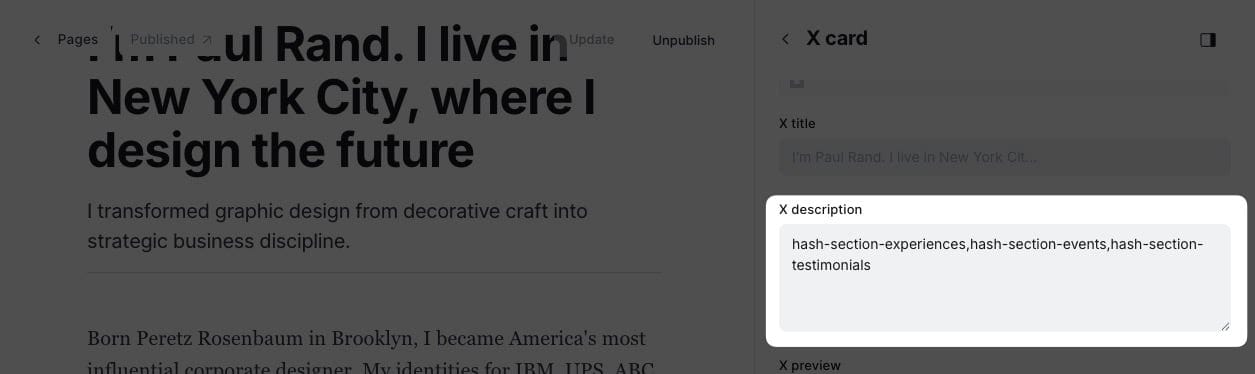
You can add additional content sections to your About page using internal tags:
- In the Twitter Description field, enter tags of sections you want to include (e.g.,
hash-section-experiences,hash-section-testimonials). - Create separate pages tagged with these internal tags.
- The content from these tagged pages will automatically appear in your About page.
This allows you to create rich About pages that include testimonials, work experience, or other structured content.
Now Template
Now is a nice place for you to show what this person is focused on at this point in their life.
It's inspired by nownownow.com projects. But we treat it differently by showing the whole history of the page, not just the latest update.
Now template example
Step-by-Step to use Now template
- Create a new page in Ghost admin (Pages > New page).
- Add a title (e.g., "Now" or the name of your collection).
- In Page settings:
- Set the Template to
Page Now. - In X Description, enter the tag slug that all posts in your series will use (e.g.,
now).
- Set the Template to
- Publish your page.
- Tag each post you want to include in the Now page with the same tag you entered in X Description. The Now Template doesn't show individual post titles
Following these steps, the page will display all the posts tagged as now and sort them by publish time, newest first.
Post Templates
The theme provides different post templates:
- Default
- Wide featured image
- Full featured image
- No featured image
- Split
- Split reverse
To choose which template to use when you publish a post:
- In the post editor page, click the icon in the top right corner to open the Post settings.
- Find the Template selector and choose the style you want for your post.
Post Page Options
The theme supports other customizations:
- Hide/Show author
- Hide/Show social sharing buttons
Step-by-Step to Customize Post Options
- Go to Settings > Design & branding > Theme > Post
- Toggle on/off each option to show/hide them from the Post page
- Click Save
Contact Page
To provide a way for your readers to contact you, create a contact page using Formspree.
Step-by-Step:
- Create a new page and give it a title (e.g., 'Contact').
- Add a feature photo (optional) and choose a layout from the Template option.
- Choose any template; a special template named "Page" is available under the template option. You can choose any other template as well.
- Add your content and the contact form code using Formspree. See the code example below.
- Click Publish.
- To add the page to the navigation, refer to the Navigation section.
<form id="fs-form" name="simple-contact-form" accept-charset="utf-8" action="https://formspree.io/f/{your_form_id}" method="post">
  <fieldset id="fs-form-inputs">
    <label for="full-name">Your name</label>
    <input type="text" name="name" id="full-name" placeholder="e.g. John" required>
    <label for="email-address">Email address</label>
    <input type="email" name="_replyto" id="email-address" placeholder="[email protected]" required>
    <label for="message">Message</label>
    <textarea rows="9" name="message" id="message" placeholder="Your message…" required></textarea>
    <input type="hidden" name="_subject" id="email-subject" value="Contact Form Submission">
  </fieldset>
  <input type="submit" class="button button-primary" value="Send">
</form>
Dark Page
Besides supporting a light/dark theme for the entire website, this theme allows setting specific pages to dark mode.
For instance, if your default theme is light, but you want certain pages (e.g., Gallery page) to be dark, you can achieve this.
Step-by-Step:
- In the Ghost admin, go to any page or post you want to set to dark mode.
- Open the Page/Post settings panel.
- In the Tags input, add the tag
#dark. - Click Update.
Custom Settings
Table of Content
You can add a table of contents (TOC) to any post. Add this HTML code to your post.
<aside class="toc-container">
    <div class="toc-sidebar">
        <h4>On this page</h4>
        <div class="toc"></div>
    </div>
</aside>
Step-by-Step
- Create a new post and write your post
- Right under the title, add an HTML card
- Insert the code above. You might want to change the TOC's header text. Maybe you call it
Table of Contents. - Publish and review it
Note: If you don't want a title (e.g., On this page), remove it from the HTML code you see above.
Posts Per Page
By default, the homepage, author's, and tag's page display a maximum of 12 posts per page, but you can change this number.
Step-by-Step
- You'll need to open the theme's
package.jsonfile in your code editor and find the following:
"config": {
    ...
    "posts_per_page": 12
    ...
}
- Change the value of the
12to the expected value. - Save your
package.jsonfile in root folder.
Google Analytics
To integrate Google Analytics, I recommend using the Google Analytics integration by Ghost.
Syntax Highlighting
You can add a fenced code block by placing triple backticks ``` before and after the code block. For example:
pre {
  background-color: #f4f4f4;
  max-width: 100%;
  overflow: auto;
}
This will produce the following gray look:
To highlight a code block, add a language alias like css or js to the code block. For example, the CSS code in the previous example will wrap between ```css and ``` as follows:
pre {
  background-color: #f4f4f4;
  max-width: 100%;
  overflow: auto;
}
This will produce the following colored look:
To add inline code, wrap the text between two backticks "`".
Prism
The theme ships with Prism.js, a lightweight, robust, and elegant syntax highlighter.
The initial Prism package includes some languages, like Markup, CSS, C-like, and JavaScript.
You can add support for more languages by adding the Prism autoloader script, which will automatically load the languages you need. Add the following script to the website admin Code Injection (Site Footer) to do this.
<script src="https://cdnjs.cloudflare.com/ajax/libs/prism/1.28.0/plugins/autoloader/prism-autoloader.min.js" integrity="sha512-fTl/qcO1VgvKtOMApX2PdZzkziyr2stM65GYPLGuYMnuMm1z2JLJG6XVU7C/mR+E7xBUqCivykuhlzfqxXBXbg==" crossorigin="anonymous" referrerpolicy="no-referrer"></script>
Click Save.
Responsive Tables
The responsive table will display a horizontal scroll bar if the screen is too small to display the full content. The following description applies to the table added using the markdown card.
By default, the table adapts to the window width. If you have a table that is too wide, it will display a horizontal scroll bar when needed.
Step-by-Step
- To add a responsive table, use the Markdown card.
- Add the markdown to create a table. To generate a table, you can use the tool Markdown Tables Generator. Below is an example
| # | Heading | Heading | Heading | Heading | Heading |
|:--|:--------|:--------|:--------|:--------|:--------|
| 1 | Cell | Cell | Cell | Cell | Cell |
| 2 | Cell | Cell | Cell | Cell | Cell |
| 3 | Cell | Cell | Cell | Cell | Cell |
Subscription is placed at the bottom of the post page and on the homepage next to the Latest post area.
You can change the subscription box's title from the Ghost Admin.
Two subscription boxes use the same copy. When you change the text, it will change in both places.
Step-by-Step
- Go to Settings > Design & branding > Homepage in Ghost Admin
- Change the copy in Email signup text input.
- Finally, click Save.
The theme comes with Ghost Native Comments integration. You can turn the comments on from your Ghost admin Settings > Membership > Access > Edit > Commenting.
Languages
The theme is fully translatable by enabling a publication language in the settings of the Ghost Admin. Before that, you must prepare your language file.
Step-by-Step
- Inside the
../locales/folder, add target language files for each translatable language used on your site. For example,fr.jsonis for French, andpl.jsonis for Polish. code must be used. - Translate the sentences used in the theme inside your new language files, for example, in
en.json:
{
    "Subscribe": "Subscribe",
    "Sign in ": "Sign in",
    "Account": "Account",
    ...
}
- And edited to translate into French for
fr.json:
{
    "Subscribe": "S'abonner",
    "Sign in ": "Se connecter",
    "Account": "Compte",
    ...
}
- Upload a theme with a new language file.
- Go to the General settings in the Ghost Admin.
- At the top of the page, you'll see the Publication info section
- Enter the correct language code into your Publication language settings menu.
- Finally, click Save to activate.
Note: Reactivate the translation file. If you edited the active language, you must restart Ghost to make the changes effective. Alternatively, enter another language code and click Save to activate, then switch back to your code.
Advanced Settings
Editing a Theme's Code
You will encounter information about editing theme files in many places in this documentation.
To edit files, you will need to unzip the theme archive – at this point, you will have access to the necessary files indicated in the theme documentation.
Edit HTML
Step-by-Step
- To edit your theme files, download a copy of the theme. For this purpose, go to the Design settings in the Ghost Admin and click Change theme in the bottom left corner.
- Use the Advanced dropdown menu in the upper right corner to download your theme, then unzip the theme locally.
- Once the theme is unzipped, the files can be edited using a code editor – make the changes indicated in the theme documentation.
You can edit files using applications (code editor) such as Sublime Text, Visual Studio Code or Brackets. Using native text editors like TextEdit on macOS may add formatting that may cause the theme to work incorrectly.
- After changing the theme code, re-zip the theme directory to upload it back to Ghost.
To create a zip archive on a macOS, right-click on the theme folder to view the context menu. Then, click the Compress option. On Windows, right-click on the theme folder, select Send to, and then select Compressed (zipped) folder.
- To upload a theme, go to the Design settings in the Ghost Admin and click Change theme in the bottom left corner.
- Click the Upload theme button in the upper right corner.
- Once uploaded, click Activate to activate the theme on your site.
Edit CSS
The best way to change the CSS is to use Ghost's built-in Code injection, the change will be applied right after you save the change.
If you need a more powerful way to change the CSS, you can edit it in the theme file. But it would need more technical setup. Follow this guide on How to apply CSS changes in your Ghost theme
If you're only looking to make minor updates to a theme, code injection may be enough.
Code Injection
Another choice for customization is to use the Ghost Code Injection settings in Ghost admin.
For a CSS example, you can use the code in the Site Header section to change the title color and font size.
<style>
  .gh-head-title {
    color: #4550E5;
    font-size: 32px;
  }
</style>
Code injection example
Check out How to use Code Injection Ghost guide for more information.
Theme Deploy with GitHub Actions
Rand comes integrated with the Deploy Ghost Theme Github action. The purpose of the GitHub action is to take the theme from the GitHub repo and send it to your website.
Follow this guide to add GitHub actions Streamline the deployment of your Ghost theme using GitHub Action.
Congratulations on setting up your Rand theme! We hope this documentation has been helpful in getting you started with creating a beautiful and functional website.
Rand is designed to be flexible and easy to customize, offering a wide range of options to make your site unique. With its modular homepage sections, diverse page templates, and extensive customization options, you have everything you need to create a professional online presence.
Become a subscriber receive the latest updates in your inbox.